How to Calculate Time in Excel: A Comprehensive Tutorial

Excel calculates time by subtracting one time value from another and formatting the result as time – and date differences work the same way, using the serial day numbers Excel assigns to every date.
That’s the whole mechanism. What trips people up isn’t the subtraction itself; it’s what happens around it: negative results when a shift crosses midnight, durations that span more than one day, and formulas that quietly ignore the date portion of a value.
We’ll cover all of it below, starting with a formula table you can copy straight into your sheet.
The Formulas at a Glance
Here’s every formula in this guide in one place, so you can grab what you need before reading further.
| What you want | Formula |
| Time difference (same day) | =EndTime-StartTime (format cell as Time) |
| Time difference in hours | =(EndTime-StartTime)*24 |
| Time difference in minutes | =(EndTime-StartTime)*1440 |
| Time difference in seconds | =(EndTime-StartTime)*86400 |
| Duration across multiple days | =EndDateTime-StartDateTime (format as d “days” h “hours” m “minutes”) |
| Days between two dates | =EndDate-StartDate (format as Number) |
| Years/months/days between two dates | =DATEDIF(StartDate,EndDate,”y”), “m”, “d” |
| Business days between two dates | =NETWORKDAYS(StartDate,EndDate,[Holidays]) |
| Fix negative time values | =MOD(EndTime-StartTime,1) |
The sections below walk through each row in detail, including the edge cases that make these formulas behave unexpectedly if you skip the underlying mechanics.
Excel Time Calculations Explained
Excel doesn’t store a date the way you see it on screen. Behind the scenes, every date is just a number.
Excel picks a starting point – January 1, 1900 – and calls that day number 1. Every day after that gets the next number in line. So January 2, 1900 is 2. January 3, 1900 is 3. In Excel’s default 1900 date system, January 1, 2026 is stored as serial number 46023.
You never see that number, because the cell’s formatting tells Excel to display it as a date instead of a plain integer. But underneath, it’s just a number – which is why date subtraction works at all: =B2-A2 is really just one number minus another. If A2 is January 1 and B2 is January 10, the answer is 9.
Excel only shows you something confusing if the result cell is still formatted as a date instead of a plain number – format it as Number and you’ll see the plain day count.
Time uses the same idea, but instead of counting whole days, it counts a fraction of one day. A full day = 1. So:
| Time | Fraction of a day | Decimal |
| 6:00 AM | 1/4 of a day | 0.25 |
| 12:00 PM (noon) | 1/2 of a day | 0.5 |
| 6:00 PM | 3/4 of a day | 0.75 |
To see this for yourself: type 6:00 AM into any cell, then go to Format Cells and change it to General. The display will flip from “6:00 AM” to “0.25” – same value, just shown differently, the same way 46023 and 1/1/2026 are the same value shown two ways.
This is worth sitting with for a second, because everything later in this article depends on it: a date-and-time value (like “January 1, 2026, 6:00 AM”) is just a date number and a time fraction added together – 46023.25. That single fact is what explains why some formulas below need the date included, and others don’t.
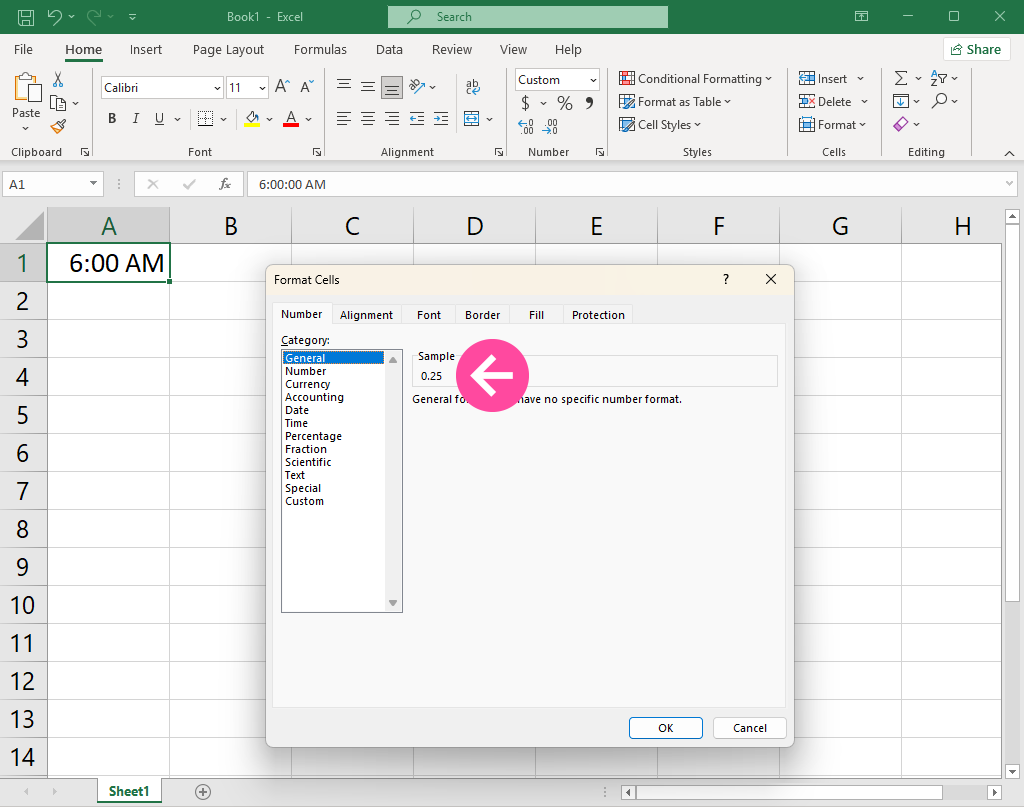
A full date-and-time value combines both systems: the integer portion is the date, the decimal portion is the time. So March 3, 2026 at 6:00 PM is stored as 46127.75. Understanding this single fact resolves most of the “why is my formula giving a weird result” problems in the sections that follow – negative times, multi-day durations, and the difference between DATEDIF and simple subtraction all come back to how these serial numbers behave.
How to Calculate Time Difference in Excel (Same Day)
To find the time between two clock times on the same day:
- Enter your start time in one cell (for example, A2: 9:00 AM) and your end time in another (B2: 5:30 PM).
- In a third cell, enter:
=B2-A2
- Format that cell as Time (Format Cells > Time, or a custom format like h:mm). Excel will display 8:30, meaning 8 hours and 30 minutes.
Converting the result to hours, minutes, or seconds
The Time format above is fine for reading, but if you need a plain number for further math (billing hours, for instance), convert the decimal directly:
=(B2-A2)*24 → total hours (e.g., 8.5)
=(B2-A2)*1440 → total minutes (e.g., 510)
=(B2-A2)*86400 → total seconds (e.g., 30600)
Each multiplier reverses the fraction-of-a-day math from the section above: multiplying by 24 turns “fraction of a day” back into hours, 1440 into minutes, and 86400 into seconds.
How to Calculate Time Between Dates in Excel (Multi-Day Durations)
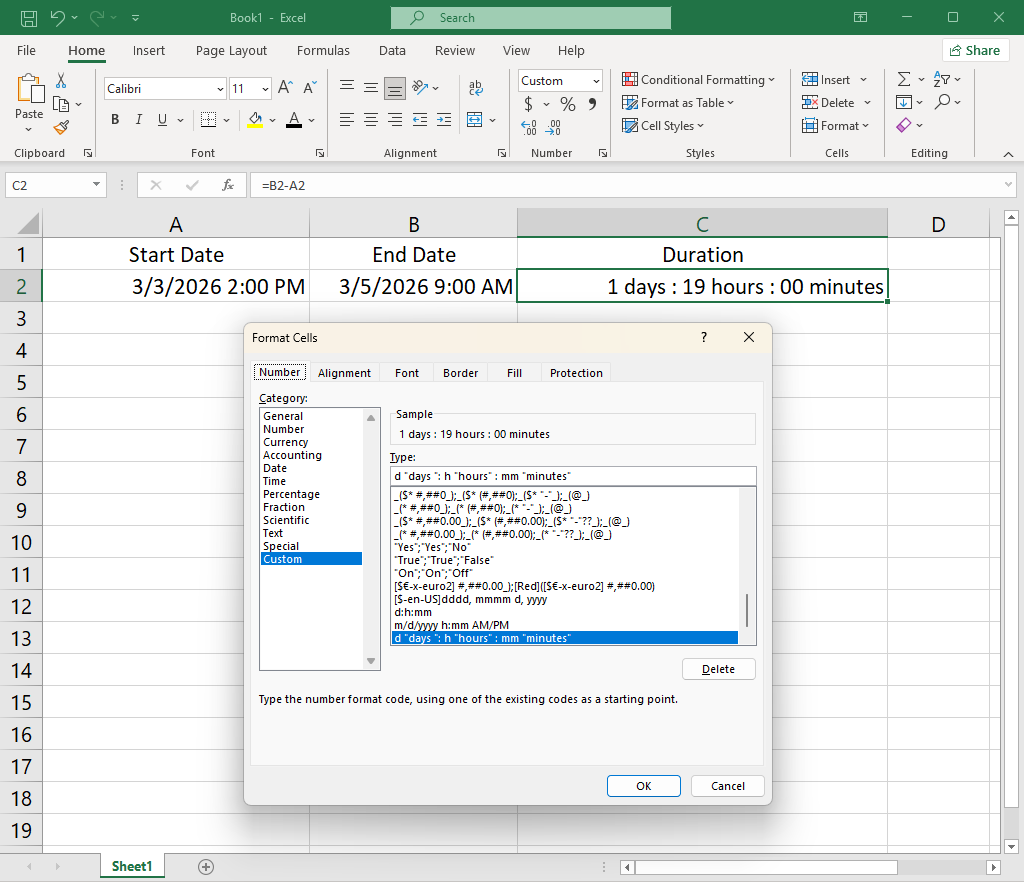
Same-day subtraction breaks down the moment a duration crosses midnight, because Excel has no way to know a second day has started unless the date is part of the value. If your start and end values include both date and time – for example, a task started at 2:00 PM on March 3 and finished at 9:00 AM on March 5 – subtract the full date-time values directly:
=B2-A2
With A2 as 3/3/2026 2:00 PM and B2 as 3/5/2026 9:00 AM, this returns a serial value representing 1 day, 19 hours. Left in its raw form, Excel may just show it as a date or a confusing decimal, so apply a custom format:
d “days” h “hours” m “minutes”
This displays the result as 1 days 19 hours 0 minutes. If you need it as a single number instead (for a total-hours column), use =(B2-A2)*24, which correctly returns 43 – because it accounts for the full day-plus-hours span, not just the clock-time portion.
Difference Between Two Dates in Excel (Days Only)
Calculating days between dates in Excel comes up constantly. Most tutorials compress it into a single bullet point. But it actually covers several distinct questions – age, tenure, project length, days until a deadline – and each one needs a slightly different formula.
Basic subtraction for whole days
If you just want the number of calendar days between two dates:
=B2-A2
Format the result cell as Number (not Date – Excel will sometimes auto-format a date subtraction as a date, which displays nonsense). With A2 as 1/1/2026 and B2 as 3/15/2026, this returns 73.
DATEDIF for years/months/days breakdowns
For age, tenure, or project duration expressed in calendar units rather than raw days, use DATEDIF:
=DATEDIF(A2,B2,”y”) → complete years
=DATEDIF(A2,B2,”m”) → complete months
=DATEDIF(A2,B2,”d”) → complete days (same as B2-A2)
For a combined “X years, Y months” breakdown, you’d typically pair “y” with “ym” (the remaining months after whole years are removed):
=DATEDIF(A2,B2,”y”) & ” years, ” & DATEDIF(A2,B2,”ym”) & ” months”
We want to flag one thing directly rather than gloss over it. DATEDIF’s “md” argument (remaining days after whole years and months) has documented inconsistencies in certain date combinations – Microsoft’s own function reference notes this.
If your calculation depends on exact leftover-day precision, verify the result against a manual count rather than trusting “md” blindly. This is one of the few Excel functions where “it usually works” is the honest description, not “it always works.”
NETWORKDAYS for business-day-only counts
If weekends shouldn’t count – project timelines, SLA deadlines, billable-day counts – use:
=NETWORKDAYS(A2,B2)
This counts only Monday–Friday between the two dates. To also exclude holidays, add a third argument pointing to a range of holiday dates:
=NETWORKDAYS(A2,B2,D2:D10)
Quick date-difference calculator in excel: if you just need a reusable block for one-off calculations, drop this into any empty cell pair – enter a start date in one cell and an end date in the adjacent one, then paste =DATEDIF(A2,B2,”y”)&”y “&DATEDIF(A2,B2,”ym”)&”m “&DATEDIF(A2,B2,”md”)&”d” into a third cell for an instant years/months/days readout. It works with any two dates you type in, no setup required.
Handling Negative Time Values
Negative time is the single most common source of the ##### error in time calculations. It happens whenever a subtraction produces a value below zero – most often with overnight shifts. A “9:00 PM to 5:00 AM” entry subtracts a later clock time from an earlier one, because Excel doesn’t automatically infer that the end time rolled into the next day.
The safer fix, and the one we recommend by default, is MOD():
=MOD(B2-A2,1)
MOD(number,1) returns the remainder after dividing by 1. This wraps a negative fractional result back into the 0–1 range. In practice, it adds a full day’s worth (1) to a negative time difference – giving you the correct elapsed time without altering anything else in your workbook.
An alternative some tutorials recommend is switching the whole workbook to the “1904 date system” (File > Options > Advanced > When calculating this workbook > Use 1904 date system). We’d rather flag this clearly than bury it as a footnote: this setting changes the epoch date for every existing date in the workbook, shifting all of them by exactly 1,462 days.
It was built for compatibility with older Mac spreadsheet files, not as a general-purpose negative-time fix, and toggling it on an existing workbook with real dates in it will silently misdate everything already entered. Use MOD() first; only consider the 1904 system for a new, empty workbook where nothing has been dated yet.
Common Time Calculation Mistakes
Most time-calculation errors trace back to one of five recurring habits. We’ve listed them here as a quick checklist, since catching one of these usually resolves a “wrong result” faster than re-deriving the formula from scratch.
- Cell formatting mismatches – a correct formula displaying as a number or a date instead of a time almost always means the result cell’s format wasn’t changed after the formula was entered.
- Mixing 12-hour and 24-hour entries – typing 9:00 without AM/PM can be interpreted as 9:00 AM by default; check the formula bar, not just the display.
- Forgetting the date in multi-day durations – a time-only subtraction across midnight will always be wrong; include the date portion whenever a span could cross a day boundary.
- Time zones – Excel has no built-in time zone awareness; cross-timezone calculations require manually adding or subtracting an offset before subtracting.
- Daylight saving time – Excel does not adjust for DST shifts automatically, so a duration spanning a clock-change date will be off by an hour unless you correct for it manually.
Most of these aren’t formula problems at all – they’re formatting and assumption problems that happen to show up as a wrong number. Checking this list before rewriting a formula will save more time than the formula itself usually does.
Excel Time & Date Function Reference
The formulas above cover the main scenarios, but it helps to have a compact reference for every date and time function in one place – so you don’t have to scroll back through the article to find the exact syntax when you need it again.
| Function | Syntax | Use case |
| TIME() | TIME(hour,minute,second) | Builds a time value from separate components |
| TIMEVALUE() | TIMEVALUE(text) | Converts text like “3:30 PM” into a real time value |
| NOW() | NOW() | Returns the current date and time |
| TODAY() | TODAY() | Returns the current date only |
| HOUR() / MINUTE() / SECOND() | HOUR(value) etc. | Extracts a single component from a time value |
| TEXT() | TEXT(value,”format”) | Displays a date/time serial as formatted text |
| MOD() | MOD(number,divisor) | Corrects negative time by wrapping the result |
| DATEDIF() | DATEDIF(start,end,”unit”) | Years/months/days breakdowns between two dates |
| NETWORKDAYS() | NETWORKDAYS(start,end,[holidays]) | Counts weekdays between two dates |
| WORKDAY.INTL() | WORKDAY.INTL(start,days,[weekend],[holidays]) | Finds a date offset by a number of working days, with a custom weekend pattern |
Keep this table handy whenever you’re working with dates and times in Excel – every function from the earlier sections is collected here in one place, without repeating the explanations.
How to Calculate Time and Date Differences in Planfix
Every formula above works, but notice what they all have in common: each one is a calculation you build once, then have to remember to re-check whenever the underlying dates change. In Planfix, the same category of problem is handled differently – time tracking in project management, durations, deadlines, days between dates. There’s no formula at all for the common cases, and a simpler, no-formula-syntax option for anything more specific.
For standard task tracking, Planfix does this automatically. Set a task’s start date and due date, and Planfix calculates the duration and deadline status on its own. No setup required. The built-in duration takes employees’ working schedules into account, including weekends and holidays. There’s no cell to format and no subtraction to get right – it’s built into how tasks work.
Sometimes the built-in tracking isn’t specific enough. Maybe you want a custom field showing the total number of calendar days between a task’s start and due dates, including weekends and holidays. For cases like this, Planfix offers Calculated task fields, part of the broader project management system. These let you define your own logic against a task’s data, using Planfix’s own formula syntax. It’s similar in spirit to an Excel formula – just built around task fields instead of spreadsheet cells.
Here’s a concrete example, set up end-to-end:
1. Open the task field settings for the relevant task type and add a new field.
2. Set the field type to “Calculated field.”
3. In the formula editor, reference the task’s “Start date” and “Due date” fields in Unix format. In this format, each date is represented as the number of seconds elapsed since January 1, 1970. Subtract one from the other, then divide the result by 86400 — the number of seconds in one day.
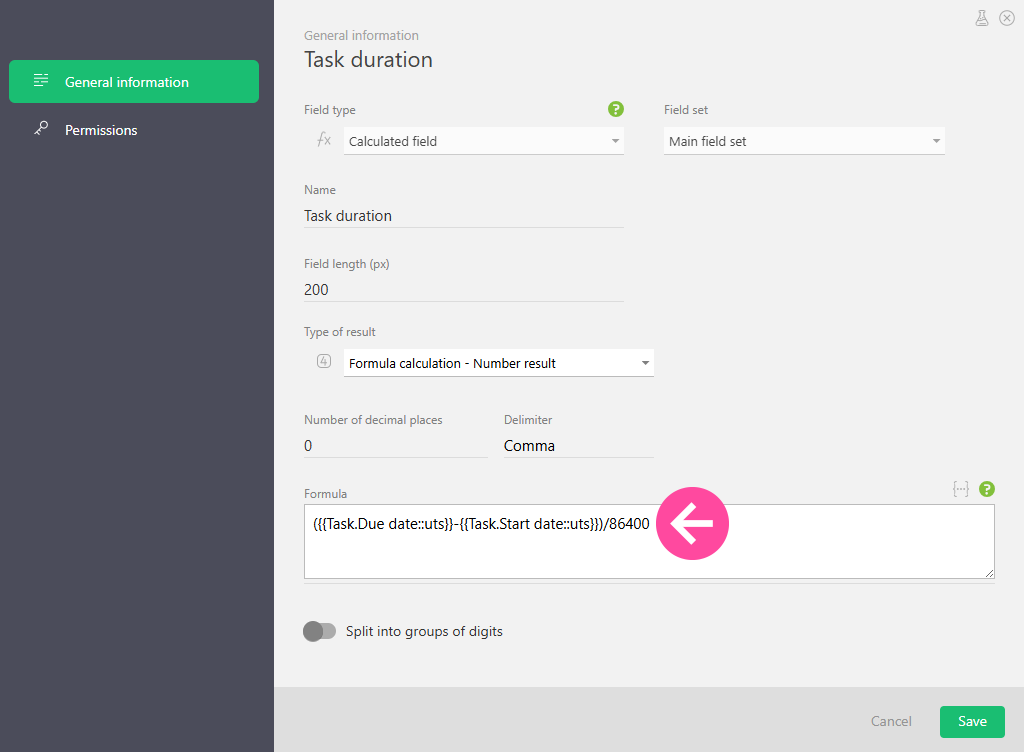
4. Set the display format for the result (for example, as a whole number of days).
5. Save the field. It now appears on every task of that type, and recalculates automatically whenever the start or finish date is edited.

One honest limitation worth naming: a calculated field isn’t a live clock. It updates only when the task data it references changes.
Compare that to NOW() in Excel, which ticks forward continuously against the current moment. A calculated field based on start and finish dates won’t do that on its own – it reflects the data as it stood at the last change, not the time that’s passed since then. For most task-duration and date-difference use cases, this doesn’t matter. But it’s worth knowing before you rely on it for real-time tracking.
If you’re tracking this kind of field across many tasks at once, it’s worth surfacing as one of the key metrics to track in Planfix dashboard – rather than checking individual tasks one at a time.
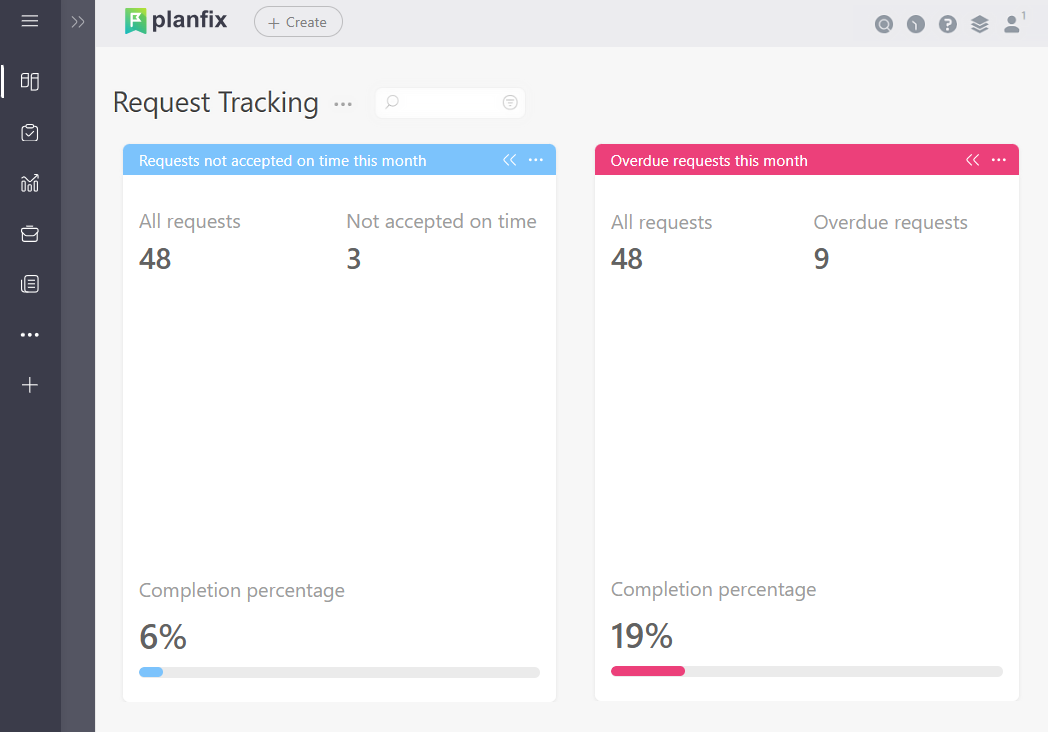
This same underlying date-and-duration tracking is what organizations managing this at scale rely on with dedicated time-tracking solutions for enterprises.
The Real Difference
An Excel time or date formula is a one-time calculation. It’s correct the moment you write it – but only as current as the last time you opened the sheet and re-checked it. Change the start date in one cell, and every downstream formula either updates automatically, or quietly goes stale. It depends on whether you built it right, or whether someone pasted values over it instead of formulas.
A calculated field in Planfix works differently. It updates itself the moment the task data it depends on changes. No sheet to reopen, no formula to re-verify.
That’s the actual shift here: not fewer keystrokes, but one less thing to remember to check.
FAQ
Why does my time subtraction show #####?
This almost always means the result is negative – usually an overnight time span where the end time is earlier in the day than the start time. Wrap the subtraction in MOD(EndTime-StartTime,1) to correct it.
How do I calculate age in Excel from a date of birth?
Use =DATEDIF(BirthDate, TODAY(),”y”) to get a whole number of completed years. This updates automatically each time the sheet is opened, since TODAY() always reflects the current date.
Does Planfix track task duration automatically, or do I need to set up a calculated field?
Standard duration and deadline status are tracked automatically the moment you set a task’s start and finish dates – no setup required. A calculated field is only needed for something more specific, like a custom day-count between two particular fields.
Will a Planfix calculated field update if I change a task’s dates?
Yes – it recalculates automatically whenever the task data it references changes. It’s not a live clock, though: it reflects the data as of the last change, not the current moment the way NOW() does in Excel.
Do I need to know formula syntax to set up a calculated field in Planfix?
You do use Planfix’s own formula syntax to define the logic, but it’s built specifically around referencing task fields – there’s no separate coding environment, and the setup is done through a formula editor in the field settings screen.
