


- What Is a Workflow Management System in Planfix?
- Creating a Custom Object and Configurable Fields in Planfix
- Building a Directory for Process Management
- Using Data Tags for Workflow Tracking and Business Process Monitoring
- Workflow Reporting in Planfix
- Low-Code Workflow Automation Without Developers
- Workflow Automation Examples Based on Simple Processes
- How to Expand Business Process Automation in Planfix
- Benefits of Custom Workflow Automation for Teams
- FAQ
We’ve already used the humble light bulb to show how everything connects in Planfix. Now it’s time to go a little deeper and look at how the setup actually works. This way, you can start building simple workflows of your own.
In Planfix, you can build a workflow using several connected elements: an object, custom fields, a directory, data tags, and a report. Each element handles its own part of the logic, but together they create a clear system for tracking, managing, and analyzing work. You can combine these elements with other Planfix features as your workflow grows.
In this article, we’ll walk through a simple example: replacing light bulbs. At first glance, it’s an everyday task. You need to know where a bulb has burned out, how urgently it needs to be replaced, what type of bulb you need, how many were used, and the total cost.
This workflow is exactly what makes it useful for seeing how Planfix lets you build custom business processes without programming. We’ll start by creating an object, then add the necessary fields, set up a directory, connect data tags, and finally build a report.
From there, you can take the same setup further to automate purchasing, track inventory, create tasks for responsible employees, and gradually turn basic record-keeping into a full-fledged workflow automation system.
What Is a Workflow Management System in Planfix?
A workflow management system helps companies define, manage, and improve their business processes. It can be used to track everything from tasks, data, and stages to statuses, assignees, results, and performance metrics.
In Planfix, workflows aren’t built around a single rigid template. Instead, you assemble them from connected elements. This allows you to configure objects around a specific process, add custom fields, and use directories to keep data consistent. From there, you can collect information through data tags and turn the results into reports.
The basic logic looks like this:
- An object defines what the team is working with.
- Fields specify what data needs to be stored.
- Directories provide consistent, reusable values.
- Data tags collect operations and metrics.
- Reports turn the results into a clear, useful view.
For example, if you were setting up a light bulb replacement process, the object would represent the replacement request or the task itself. Meanwhile, custom fields can capture its urgency while a directory can store the available bulb types. Data tags can track quantity, location, and cost, while a report can show replacement statistics and total expenses.
This is where the pieces start to click into place, and individual settings become one connected data management process.
Creating a Custom Object and Configurable Fields in Planfix
Let’s start with the most important part: the object. First, we’ll add a real-world object to Planfix.
An object describes the entity or process your team will work with. In our case, this will be a light bulb replacement. Of course, it doesn’t have to involve light bulbs. It could be a repair request, customer order, support ticket, document approval, equipment purchase, service operation, or virtually any other business process.
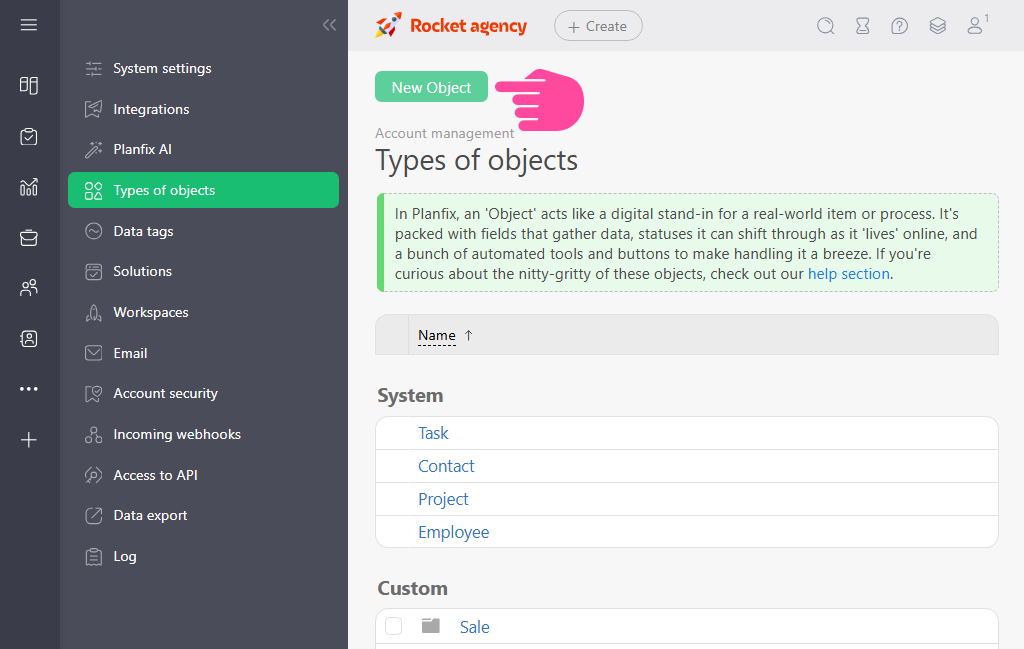
To create a new object, go to “Account Management” – “Types of objects” and select “New object”.
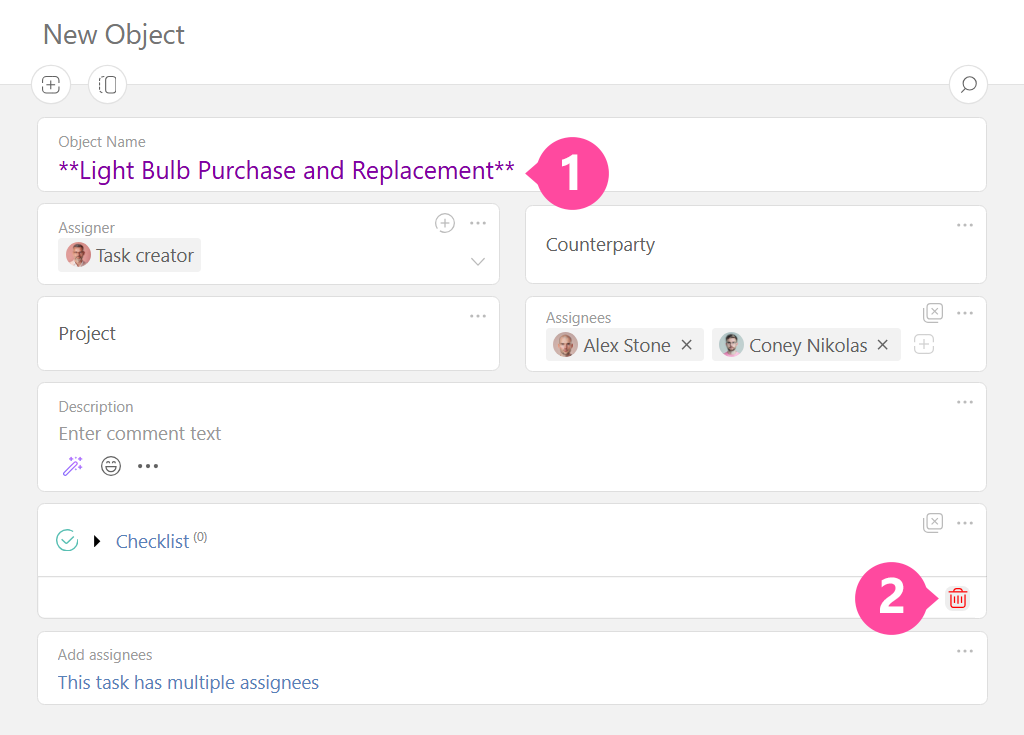
Enter the object name and remove any fields you don’t need.
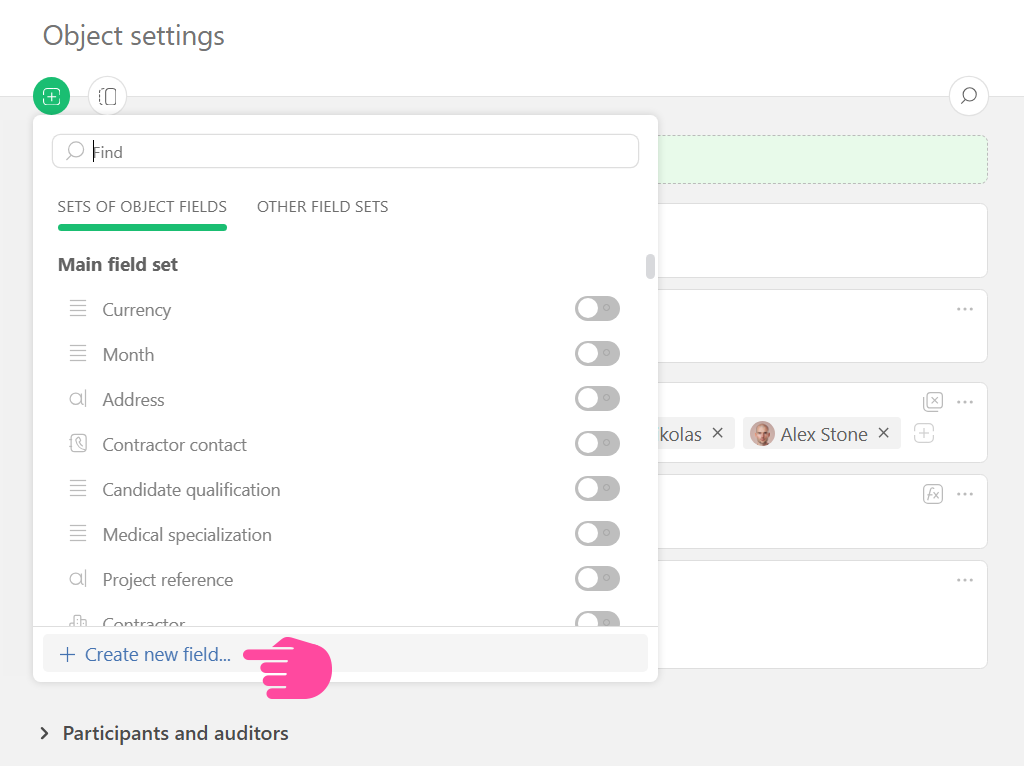
Next, add a new field. In this case, we’ll make it: “Replacement urgency”.
It’s a simple field, but it already adds business logic to the process. Instead of simply creating a request, an employee can immediately indicate how quickly the replacement needs to be handled.
That’s the primary idea behind a configurable workflow system. Rather than forcing your process into a rigid system structure, you configure the system around the way your company actually works.
Creating Custom Objects for Workflow Management
Custom objects let you model your own processes instead of relying on one-size-fits-all templates.
Traditional systems often come with a fixed set of entities, such as tasks, projects, customers, and deals. However, real business processes tend to be much more varied. One company may need to track equipment while another needs to track service requests. Meanwhile, others mainly deal with inventory operations, inspections, approvals, or internal support requests.
Planfix lets you configure an object around a specific process, such as:
- “Light bulb replacement”
- “Service request”
- “Material purchase”
- “Equipment repair”
- “Facility inspection”
- “Invoice approval”
- “Customer request”
Each object can have its own fields, statuses, card layout, and workflow logic. This lets Planfix function as a flexible workflow system, where processes can be shaped around how your business actually operates.
In our example, the “Light bulb replacement” object becomes the process foundation. It gives the team a place to record what needs replacing, where the problem occurred, how urgent it is, and what information to track as the work moves forward.
Configuring Fields, Statuses, and Workflow Logic
Now let’s configure the “Replacement urgency” field we created in the last section.
Here’s the setup:
- Select “List” as the field type.
- Add a description so it’s clear what the field is used for.
- Choose “Buttons” as the field display.
- To give each button a different color, enable “Set colors for list values.”
- Add a name and color for each value.
For example, you could choose:
- Low
- Medium
- High
- Urgent
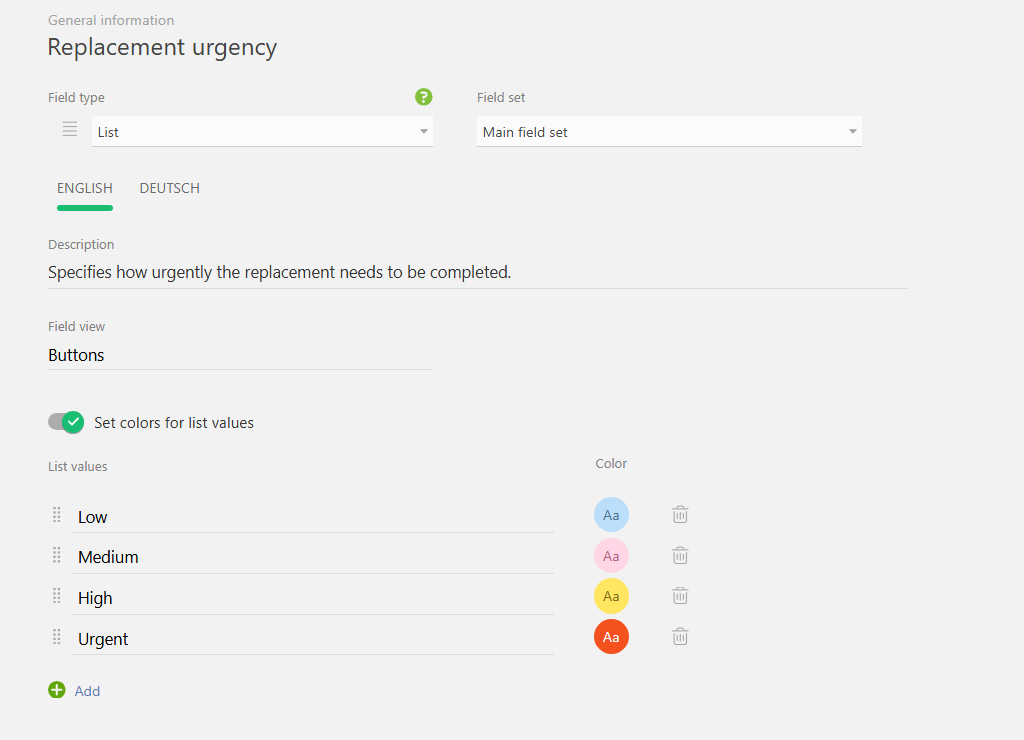
Colored badges make it much easier to scan tasks at a glance. When dozens of requests are in the queue, employees don’t have to open and read every card to determine its status. Instead, they can immediately spot what needs attention first.
This is workflow customization in practice. Instead of just adding another field, we’re adding a visual tool for managing the process. This means the team can assess the situation faster, managers can see priorities at a glance, and the workflow becomes clearer for everyone involved.
Fields aren’t limited to urgency, either. In other workflows, you might use fields for statuses, categories, request types, lead sources, reasons for rejection, SLA levels, responsible departments, or any other parameter that matters for managing the work.
Building a Directory for Process Management
Next, let’s create a directory for our light bulbs.
A directory keeps process data consistent. If every employee types in the bulb name manually, you’d end up with variations like “LED 10W,” “10-watt LED,” “10W bulb,” and “10W LED light.” That’s four completely different entries from the same bulb, and a reporting headache waiting to happen.
A directory solves this problem by giving the team a predefined list of values to use throughout the process.
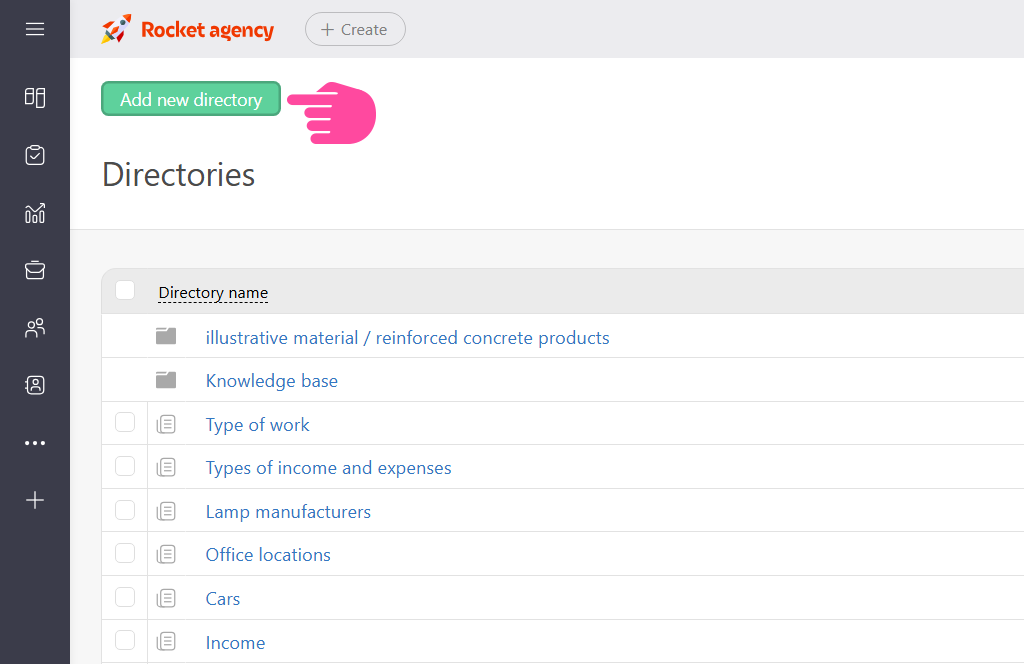
To add a new directory, go to “Main menu” – “Directories” and click “Add new directory.”
Next, give the directory a name and add the fields it will contain one by one. Make sure to select the appropriate type for each new field you create. For example, “Price per Unit” should use the “Number” field type.
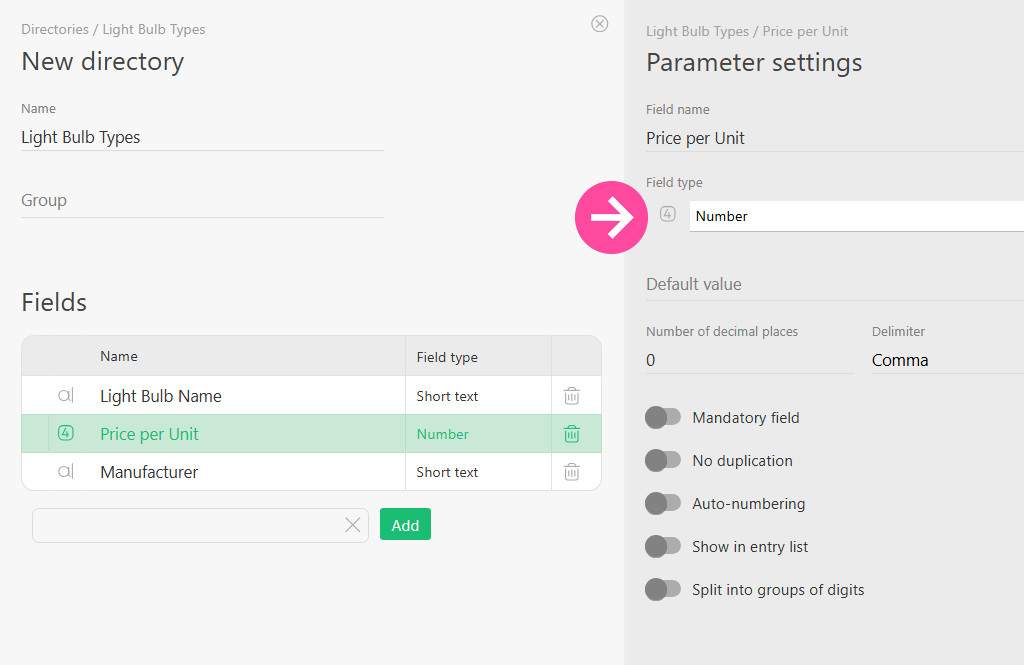
For the “Light bulb types” directory, you could add fields such as:
- Bulb name
- Wattage
- Base type
- Manufacturer
- Price per unit
- Inventory code
- Comment
Once you save the directory, you can start filling it in. To do this, click “Add entry” and enter the required values.
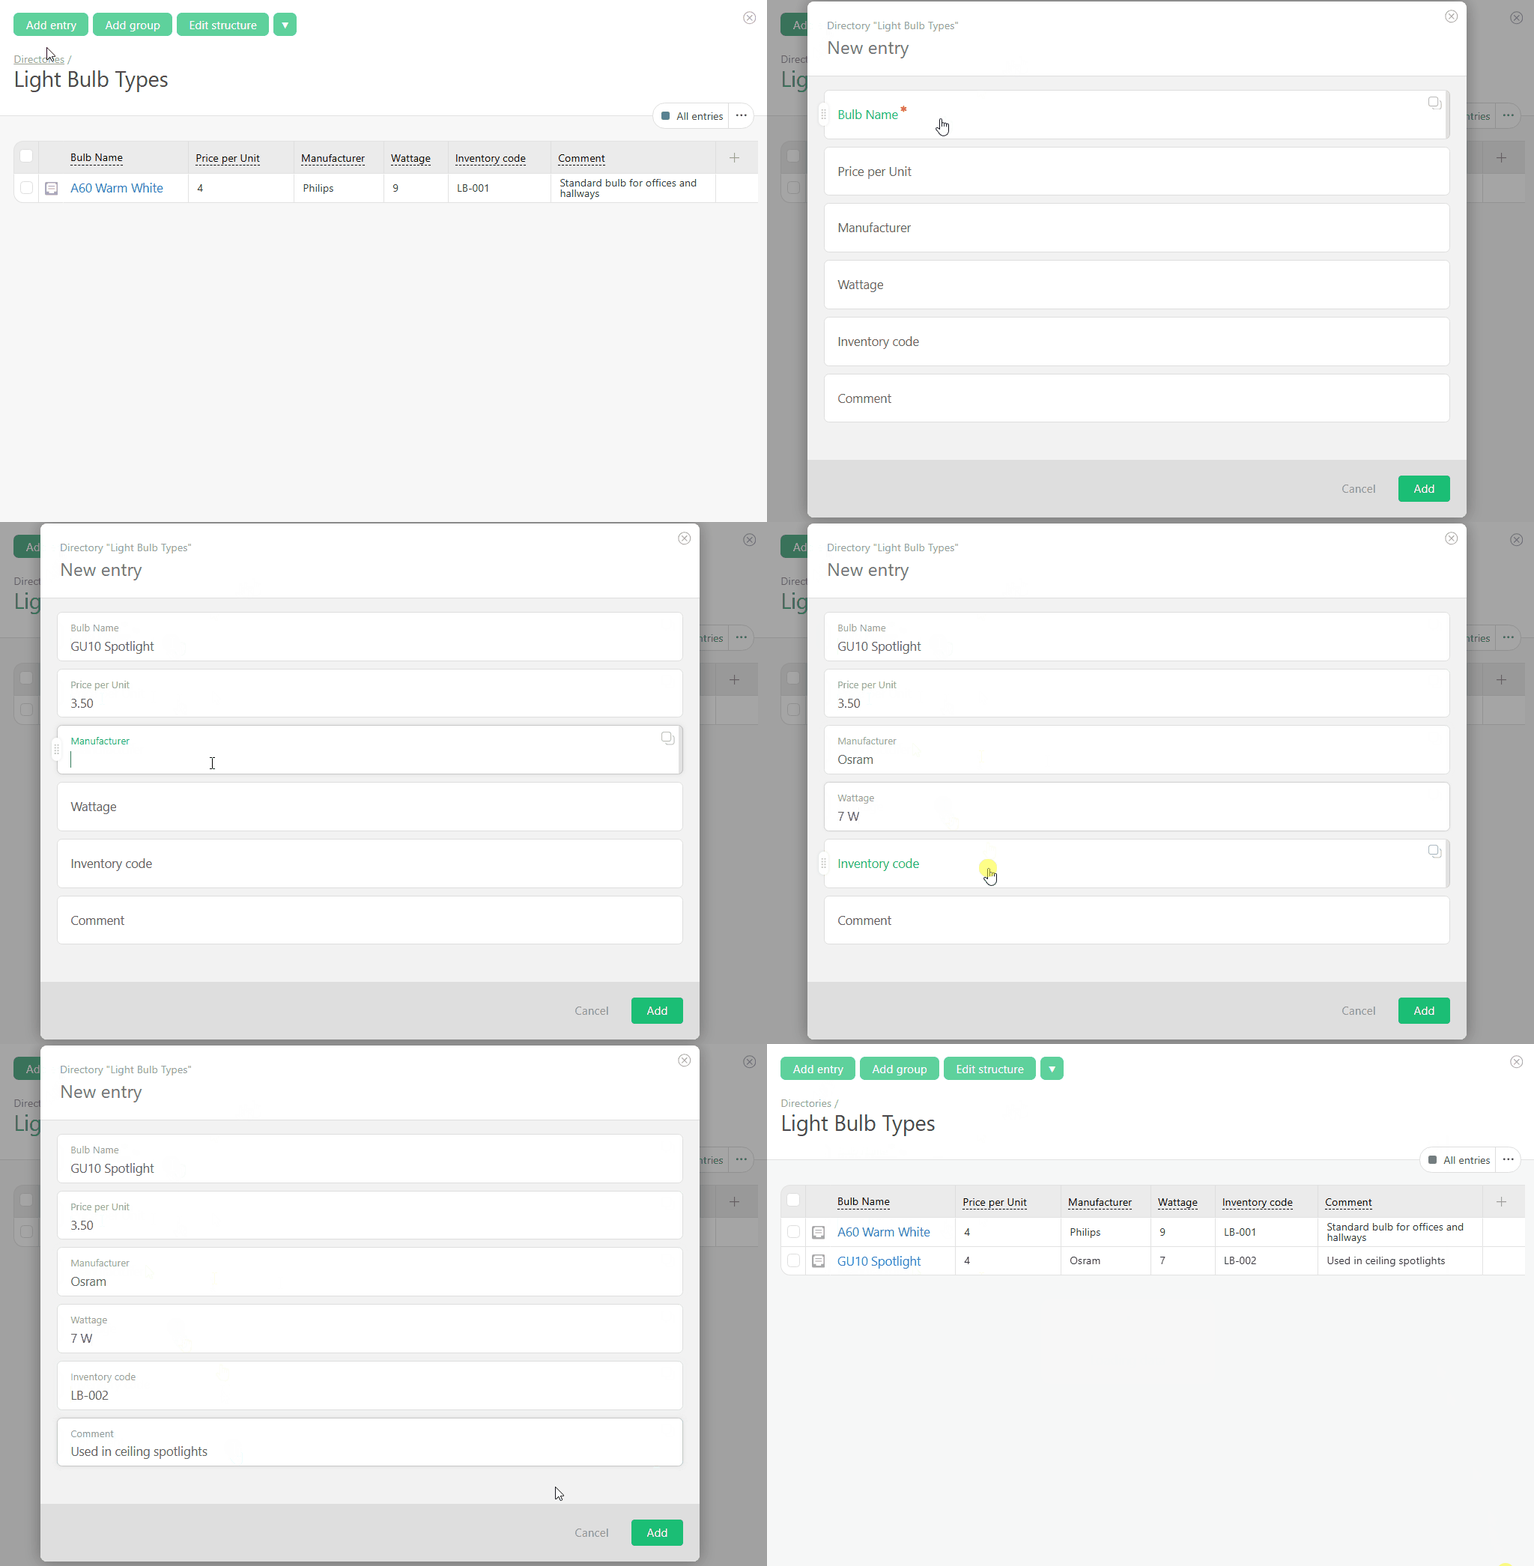
A directory-based structure keeps your data organized and consistent. Instead of entering the same information manually every time, employees can select predefined values from the directory. This simplifies the process management workflow and makes reporting more accurate.
And directories aren’t just for light bulbs. You could use them for:
- Equipment types
- Request categories
- Departments
- Services
- Pricing plans
- Materials
- Suppliers
- Reasons for contact
- Expense categories
The basic principle is always the same: if information repeats and needs to stay consistent, it probably belongs in a directory.
Using Data Tags for Workflow Tracking and Business Process Monitoring
Now it’s time to add some simple tracking.
When it comes to accumulated data, it is best stored in data tags. In Planfix, data tags help capture operations and performance indicators directly inside a process. These are not just fields on a card, but separate entries that can later be analyzed, grouped, and included in reports.
Here’s how we would add data tags to our light bulb replacement process.
Go to “Account management” – “Data tags” and select the appropriate group. If you can’t find a group that fits, click “Add group” and give it a custom name.
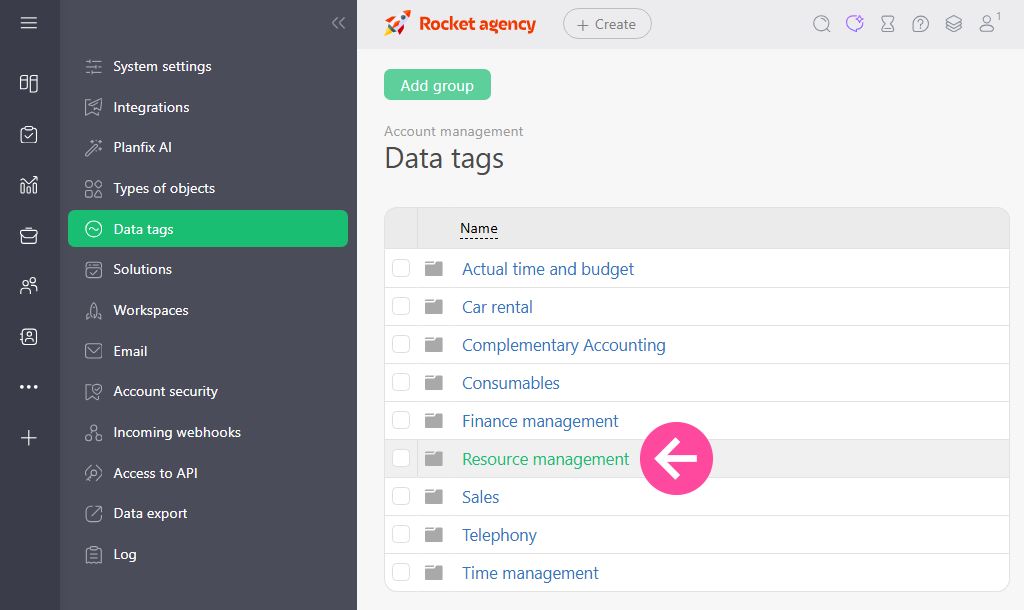
Once you’re inside the group, click “Add data tag” and enter the title of your choice. From there, you can configure the data tag structure.
Here’s how to add a field linked to a directory:
- Enter the field name.
- Select “Directory” entry as the field type.
- Choose the required directory. In our case, this will be “Light Bulb Types.”
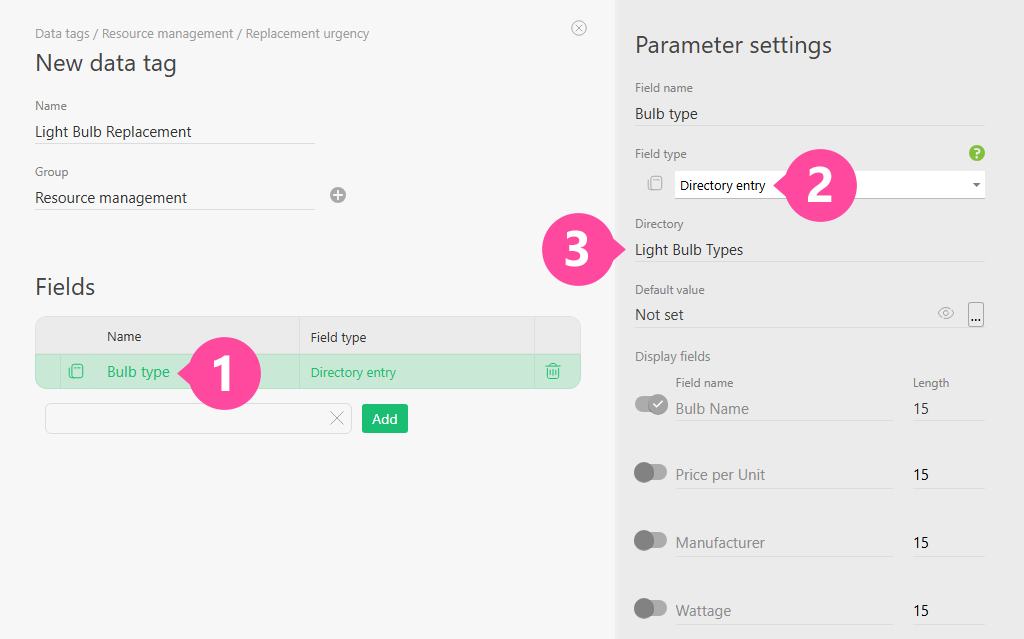
We’ll also add a “Room” field. This will function as a “List” field where you can specify the relevant locations.
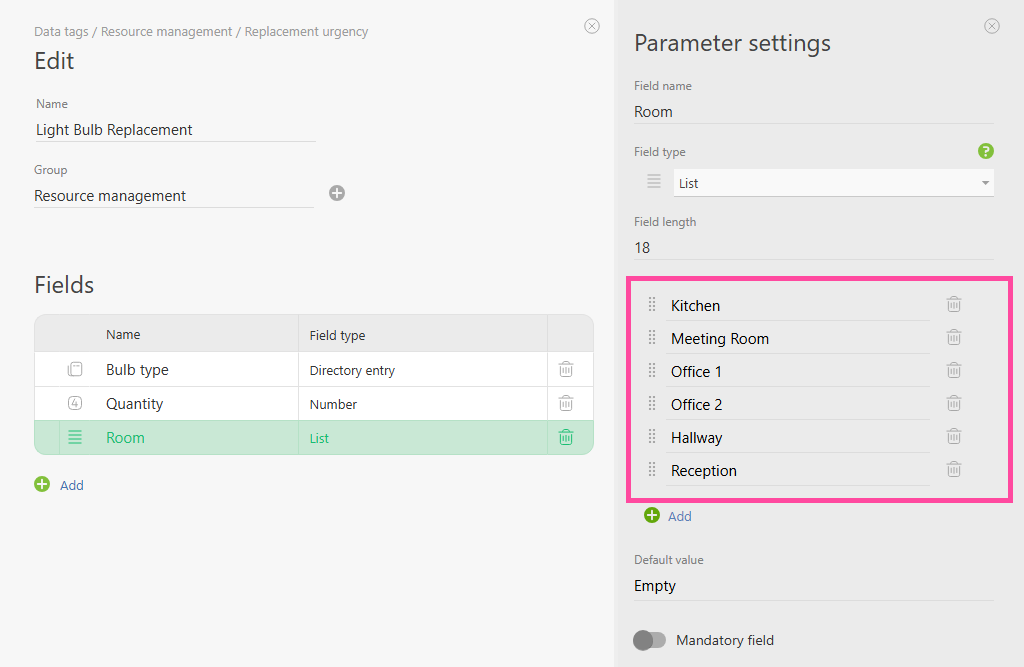
The data tags can now store information such as:
- Bulb type
- Room
- Quantity
- Price per unit
- Replacement date
- Responsible employee
- Any relevant comments
This is where workflow data tags starts to add real value. Rather than just completing the work, you’re actually building a history of the process. Over time, you can see which rooms require replacements most often, how much maintenance costs, which bulb types are used most frequently, and where recurring issues appear.
This is a perfect example of business process monitoring in practice. Once the process becomes measurable, decisions can be based on data rather than guesswork.
Workflow Reporting in Planfix
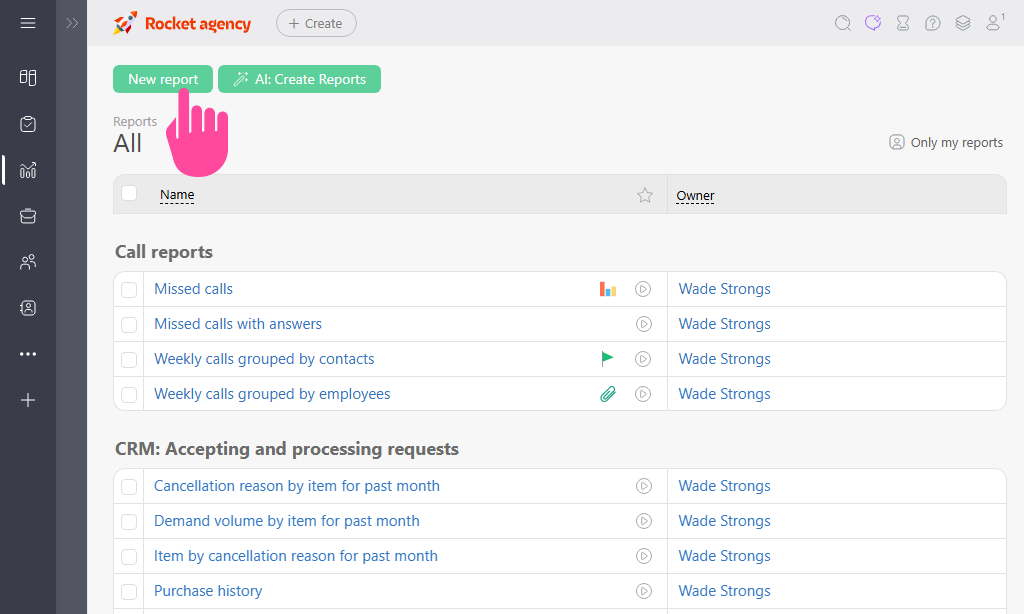
To visualize the data we’ve collected, let’s create a report that presents everything in a clear format.
To create a new report, go to “Reports” and click “New report.”
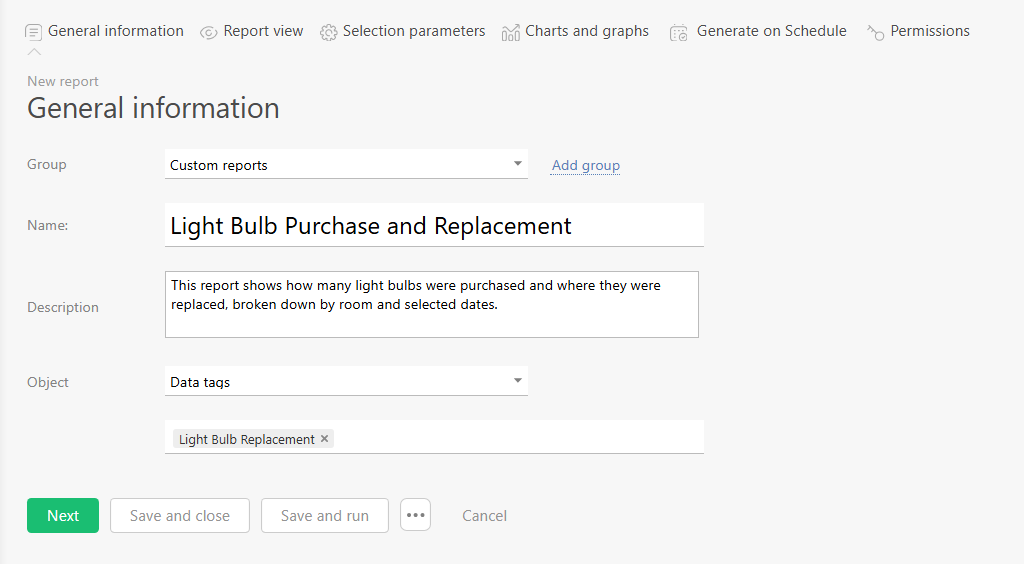
Now simply fill in the basic information, such as:
- Report name
- Description
- The object the report will use as its data source
In our case, the report object is the “Light bulb replacement” data tag.
Next, open the “Report view tab” and add the required columns. The setup works as follows:
- Set “Object” to data tags.
- Set “Property” to Bulb type.
- Because this field links to a directory, select the specific directory field you want to display.
- To speed up the process of adding the remaining fields, you can simply duplicate the column.
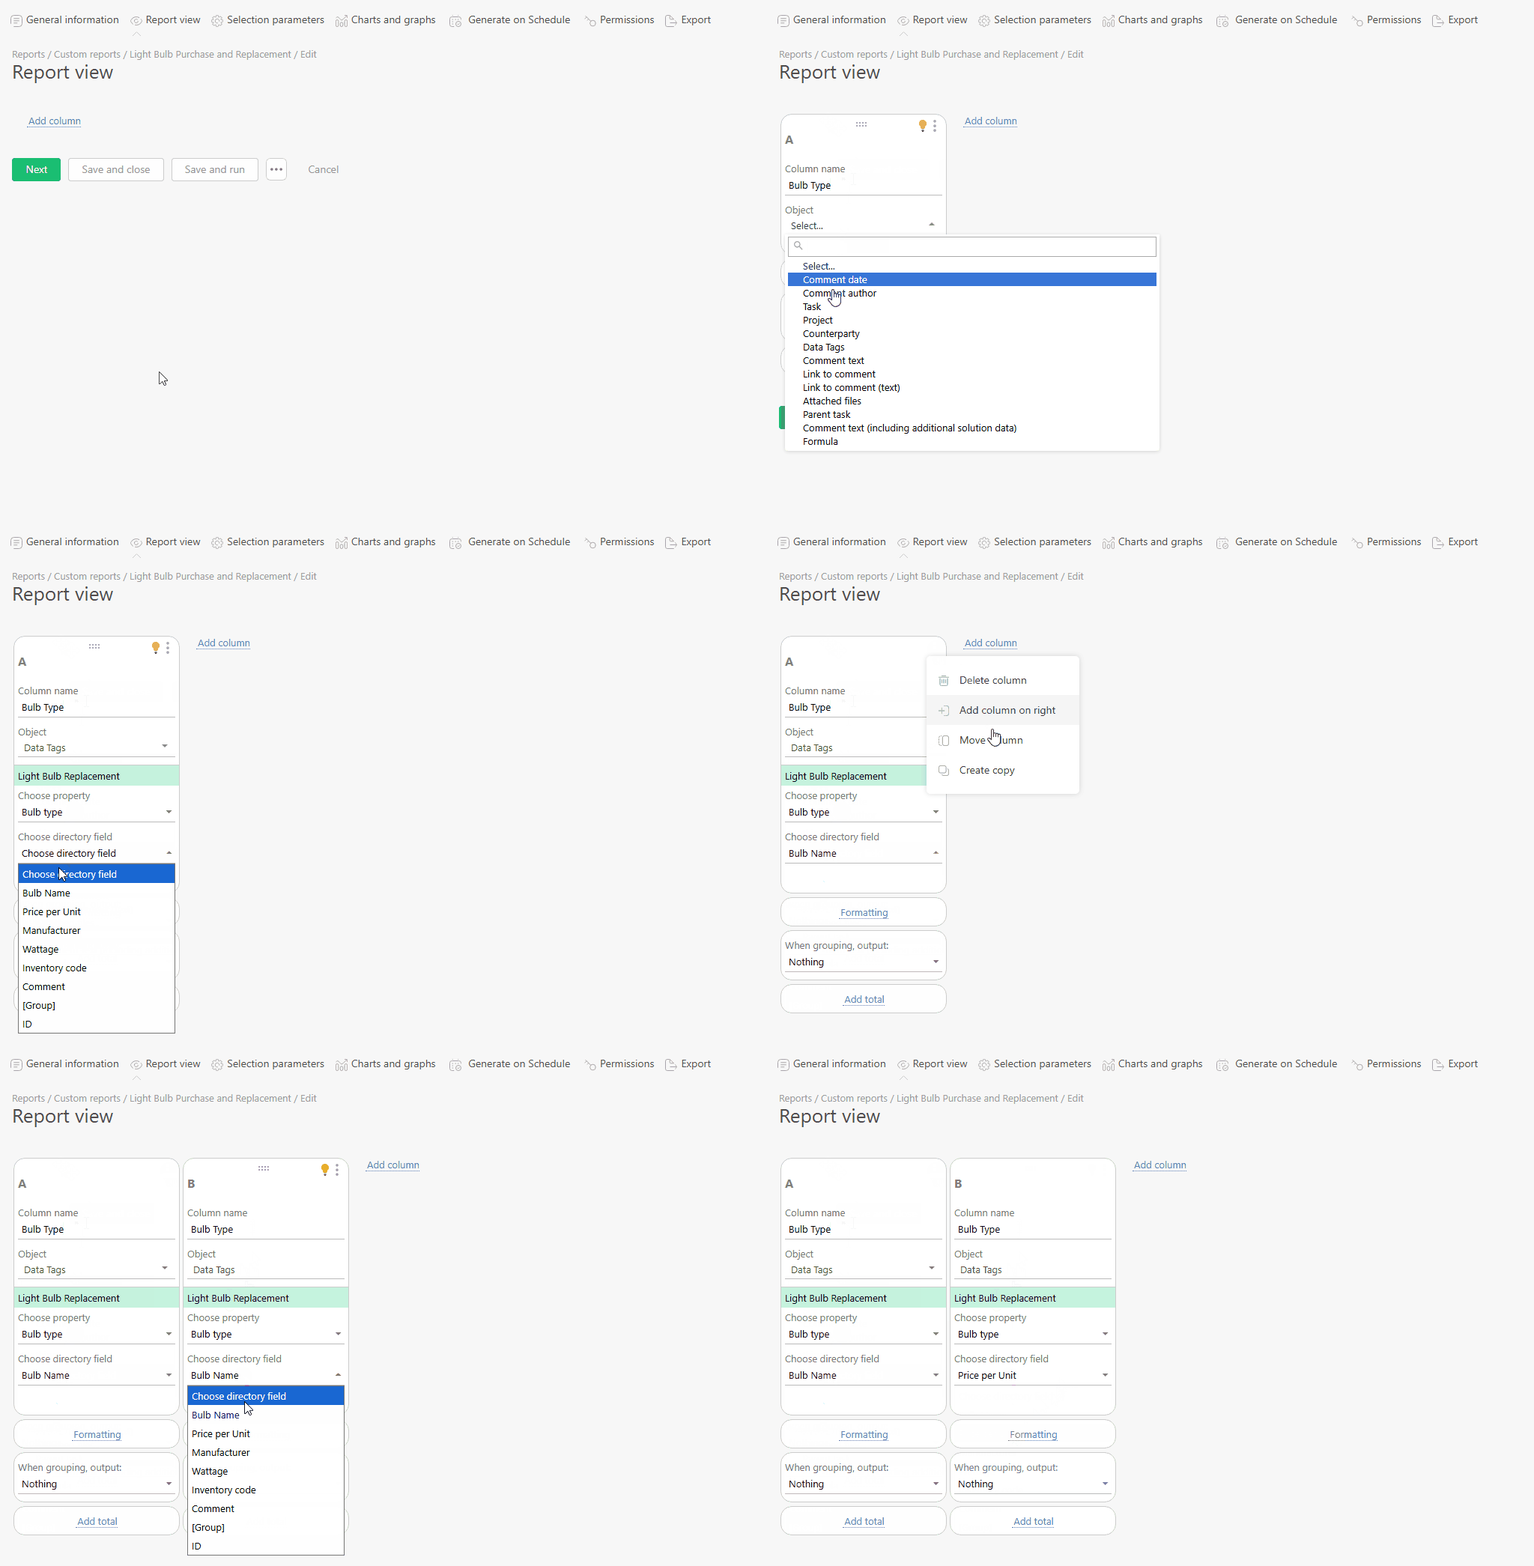
Here is an example of how to configure the report columns:
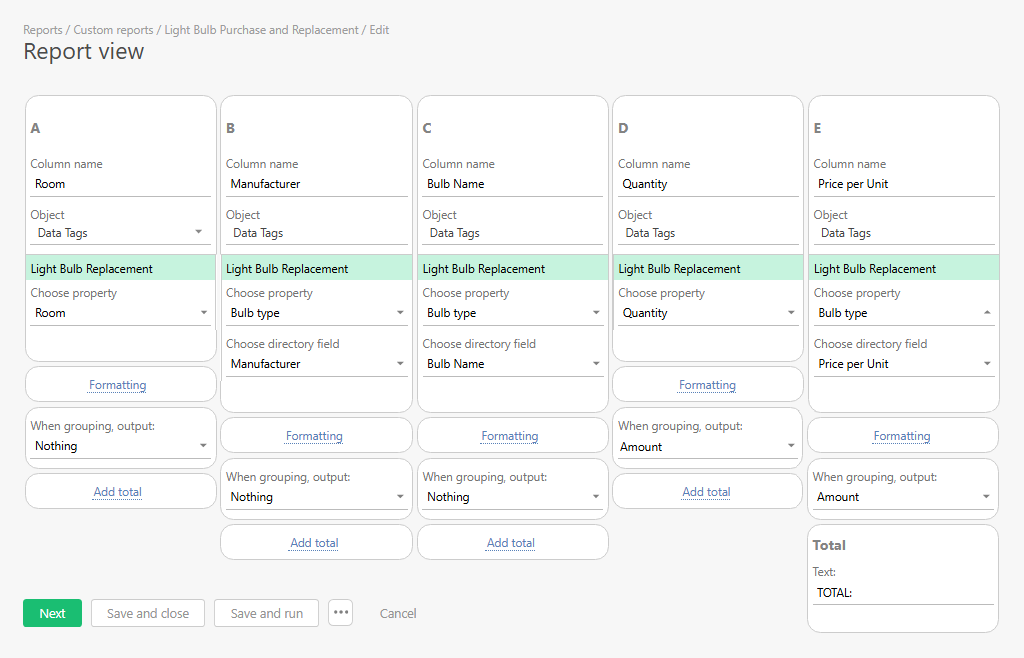
For the “Quantity” and “Price per unit” columns, configure grouping to display the sum of values. To see the total amount spent, add a final total at the bottom of the “Price per unit” column.
In the filter settings, you can specify the object and creation date so the report only includes data tag entries from the current month. For even easier analysis, group the results by room and sort them by quantity.
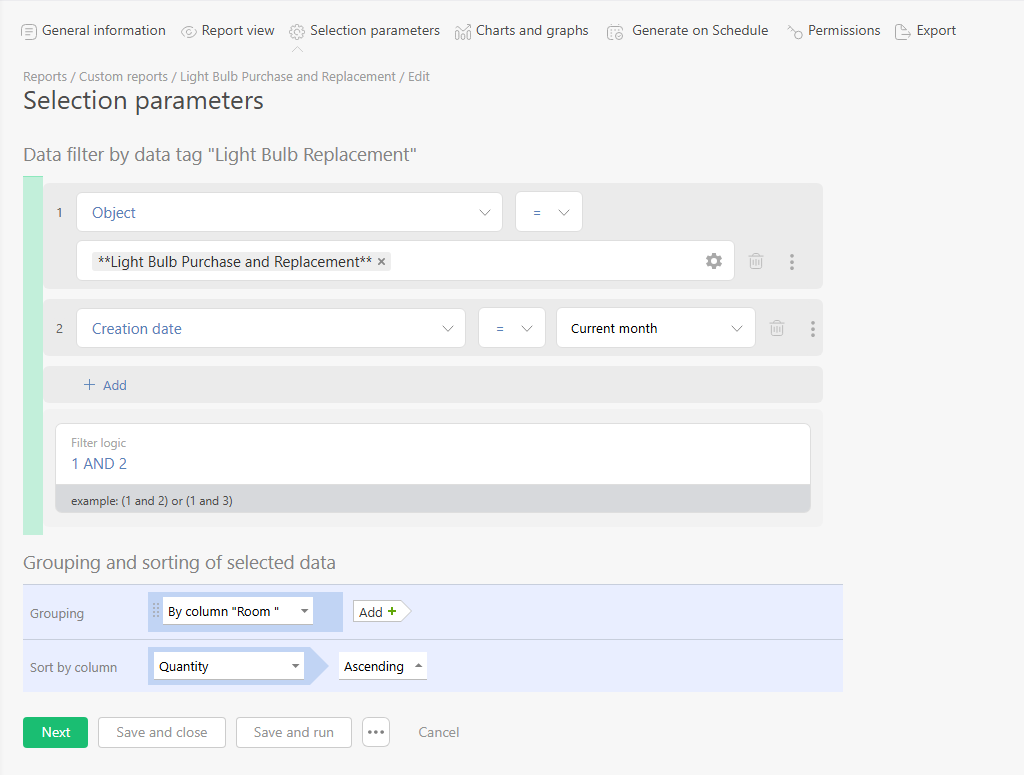
This is where workflow reporting helps you move beyond individual entries so that you can see the bigger picture. This includes valuable information like:
- How many light bulbs were replaced.
- Where the most replacements occurred.
- Which types of bulbs were used.
- How much money was spent.
- Which rooms require more attention.
- How the workload changes from month to month.
Planfix reporting turns accumulated data into useful information managers can use to quickly assess costs, spot unusual patterns, and decide what to do next, be it stock up on certain bulbs, inspect the electrical system in a particular room, or adjust the maintenance process.
How Planfix Workflow Components Work Together
| Component | Purpose | Business Benefit |
| Objects | Store workflow entities | Flexible process setup |
| Custom fields | Add business logic | Workflow customization |
| Directories | Structure reference data | Unified information |
| Data tags | Track metrics and operations | Better process monitoring |
| Reports | Visualize workflow data | Faster decision-making |
As the above chart shows, each element serves a different purpose while contributing to the overall workflow. The object provides the foundation for the process while the fields describe the important parameters. The directory provides consistent values while the data tags collect operational data. Finally, the report brings everything together to show the result.
On their own, they’re just a handful of configuration elements. Put them together, and you get a working process you can monitor, analyze, and improve over time.
Low-Code Workflow Automation Without Developers
The biggest advantage of Planfix is that you don’t need developers to set up a simple process.
Planfix can be used as a low-code automation platform, meaning that users can create an object, add fields, configure a directory, connect data tags, and build a report directly through the system interface.
This is especially valuable at companies where processes change frequently. Today you might need to track light bulb replacements. Tomorrow, it’s air conditioner maintenance. The day after that, you’re managing supply purchases, requests from branch offices, or internal approvals.
If every change requires development work, adapting the system quickly is not only slow, but expensive. When teams can configure the logic themselves, they can respond to changing needs much faster.
A low-code approach helps you:
- Launch processes without development
- Test ideas quickly
- Expand the structure as your needs grow
- Add fields and reports for new requirements
- Gradually move from basic tracking to automation
This is how Planfix helps teams build automated business workflows without a complicated implementation process. You start by defining the process and configuring its core elements. From there, you can add automated actions, notifications, tasks, and additional scripts as the workflow evolves.
Workflow Automation Examples Based on Simple Processes
The light bulb replacement process may seem simple, but you can apply the same logic to many other workflows, including far more complex ones.
We’re using it here because it’s a perfect workflow automation example: you have an object, structured data, a directory, operational tracking, reporting, and plenty of room for further automation.
You can use the same approach to set up processes for:
- Purchasing consumable materials
- Equipment maintenance
- Office equipment repairs
- Employee requests
- Tracking operational expenses
- Document approvals
- Inventory control
- Processing service requests
- Internal requests between departments
- Scheduled facility inspections
For example, in a purchasing workflow, the object could be “Purchase request,” the directory could be “Materials,” the data tags could track “Purchase expenses,” and the report could show “Monthly purchases.”
For equipment maintenance, the object could be “Repair request,” the directory could contain “Equipment types,” the data tags could track “Completed work,” and the report could show “Maintenance by Department.”
In all of these examples, the underlying logic stays the same – only the entities, fields, and metrics change. That’s why understanding the setup principles matters. Once you know how the pieces fit together, you can build a process for almost any internal workflow.
How to Expand Business Process Automation in Planfix
At this point, our basic light bulb replacement process is up and running. However, there’s still plenty of room to expand and improve it. This is where the next level of business process automation begins.
For example, you could automate inventory monitoring so that if the stock of a particular bulb type runs low, the system creates a purchase task or notifies the responsible employee.
You could also automate task creation for replacements. If an urgent replacement is logged, the system could automatically assign a task to the employee responsible for facility maintenance.
Notifications are another option. For instance, if a replacement isn’t completed on time, the manager could receive an alert while the system automatically makes the task more visible in the team’s work queue.
Reporting can grow with the process, too. You might add monthly expenses, compare costs across rooms, track statistics by bulb type, or identify recurring problems.
Other possible improvements include:
- Monitoring the number of bulbs in stock
- Automatically creating purchase tasks
- Notifying the right employees about urgent replacements
- Tracking actual expenses
- Identifying rooms with frequent replacements
- Building reports by month and department
- Adding purchase approval stages
- Linking requests to responsible employees
This is how process automation tools help a system evolve step by step. There’s no need to build an elaborate workflow from day one. You can start with simple tracking, see how the process works in practice, and then add automation wherever it actually saves time.
Benefits of Custom Workflow Automation for Teams
Every team has its own processes, priorities, and ways of working. Custom workflow automation helps teams work with greater clarity, speed, and consistency. The benefits are abundantly clear:
- Processes become more structured because employees know what data to enter, where it is stored, and what happens next.
- Information also becomes easier to manage. Instead of relying on free-form text and scattered spreadsheets, teams can use directories, structured fields, and reports to keep important data organized and consistent.
- Managers gain better visibility into day-to-day operations. They can see how many requests have been created, which ones are urgent, where costs are increasing, and which areas may need attention.
- Custom workflows are also easier to adapt as business needs change. You can add a field, update a directory, modify a report, or introduce a new script without redesigning the entire process.
- Finally, teams can gradually move from manual tracking toward greater automation. A process might begin with simply recording information in the system. From there, you can add reports, notifications, automatic tasks, deadline controls, and additional scripts.
Planfix is well suited to this kind of setup because it lets you build workflows from connected elements. This means you are not limited to a single predefined template, but can easily configure the system around the way your company actually works.
Don’t be afraid to experiment with Planfix. And if you have questions along the way, feel free to reach out to the Support team – they’ll be happy to help you work through the setup.
FAQ
What is a workflow management system?
A workflow management system is software that helps companies organize, control, and improve business processes. The system connects tasks, data, statuses, employees, reports, and automation rules in one environment. Instead of managing work through scattered chats, spreadsheets, and manual notes, teams can build structured workflows and monitor how each process moves from start to finish.
How does workflow automation work in Planfix?
Workflow automation in Planfix works through connected elements such as objects, custom fields, directories, data tags, reports, processes and scripts. Using these elements, a company can describe its own workflow, define what data must be collected, track operations, and build reports. After the basic structure is ready, automated actions can be added to reduce manual work and improve control.
Can I create custom workflows without coding?
Absolutely. One of Planfix’s key strengths is the ability to configure workflows without involving developers. Users can create objects, add custom fields, build directories, set up data tags, and create reports directly through the interface. This low-code approach helps teams quickly adapt the system to real business processes without waiting for technical implementation every time something changes.
What are custom objects in CRM systems?
Custom objects are configurable entities that represent the specific things a company needs to manage. In CRM and workflow systems, they can describe requests, orders, equipment, service cases, approvals, inspections, or any other business process. Custom objects help companies move beyond fixed templates and build workflows that match their actual operations.
How does Planfix help with business process monitoring?
Planfix helps with business process monitoring by collecting structured data through fields, directories, and data tags, then displaying that data in reports. Teams can track quantities, costs, statuses, workload, deadlines, and other metrics. This makes it easier for them to understand what is happening inside a process and make decisions based on real data.
Can Planfix automate internal company processes?
Planfix is designed to bring different company business processes together in a single information environment. It allows users to automate maintenance requests, purchasing, approvals, equipment service, stock control, task assignment, reporting, and employee notifications. A simple workflow can start with structured data collection and then grow with automation rules, scripts, reminders, and reports as business needs develop.
