
One of the main goals of Planfix is to streamline routine tasks and operations. If something can be automated and simplified, it should be. This applies to planning, building customer relationships, fine-tuning business processes, and even seemingly “little things” like layout and document creation.
Those who have used Planfix for a while know it helps you create documents based on predefined templates. Planfix inserts the necessary details in the right place — the business date, counterparties, responsible manager, etc. The key is to predefine the required variables in the document template, which are then replaced with specific data.
Working with Images in Planfix
Perhaps not all of you know that Planfix can insert details, photos, images, and other illustrations where you want them in your document. Below, I explain how to set this up and use it in your work.
Templates help speed up the creation of standard documents. This can be a standard lease agreement, where only the terms and customers change; a product sales agreement, where you must specify the product, price, and delivery quantities; or a warranty card for the equipment sold.
It is essential that the form of the document remains unchanged and only the content changes. Then, Planfix can automatically insert the required data in the right place and save employees a lot of time.
In addition to written information, images can be inserted into the document. For example, product images can be inserted into a commercial proposal. Let’s take a company that sells reinforced concrete products as an example. Let’s call it “Concrete and Comrades.”
Image Database
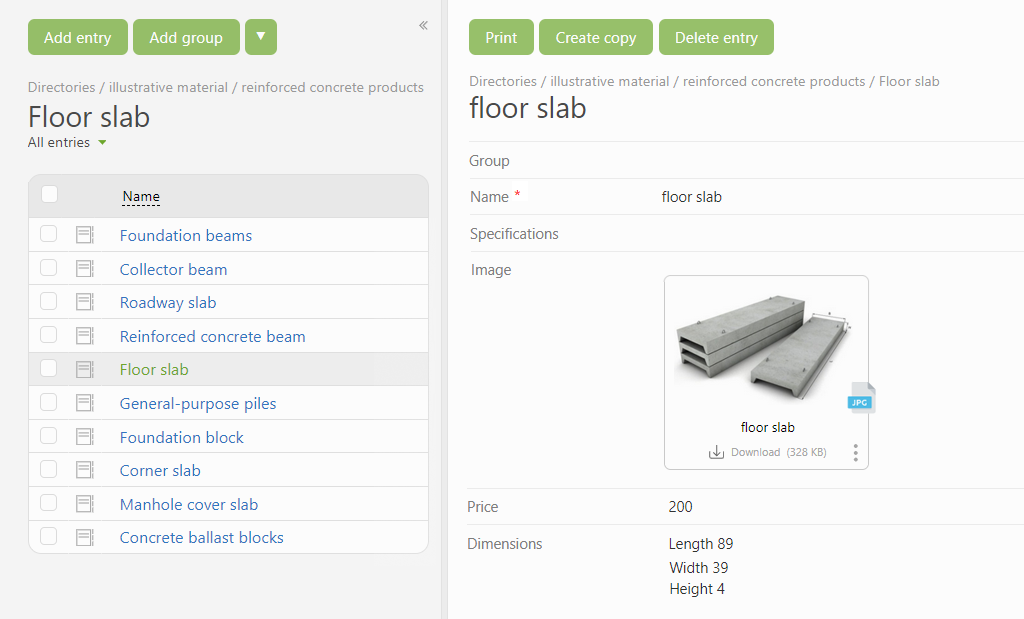
The first thing we need to do is create a directory of available products. In it, we add dimensions, price, description, and images:
Creating an Application
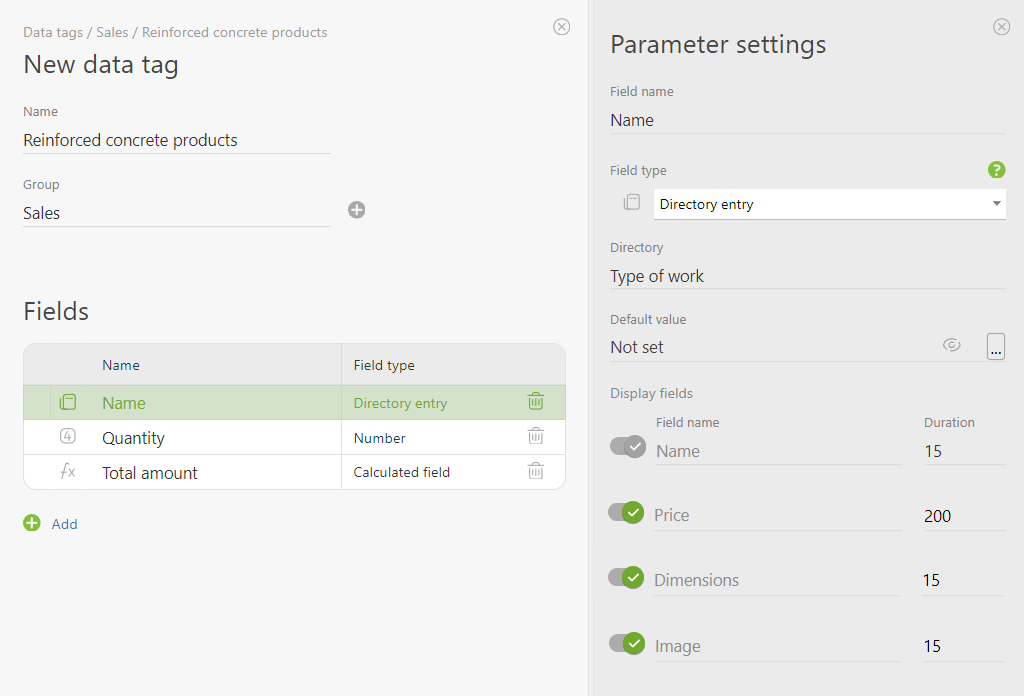
We will manage the images in the commercial proposal using a data tag that processes entries from the directory.
We add three fields to the data tag:
- Name – a “Directory entry” type field where all necessary details will be displayed.
- Quantity – a “Number” type field, where we enter the quantity of goods.
- Total amount – a calculated field that calculates the total cost using a formula.
This is what the data tag settings look like:
This is what the data tag filled out by the employee looks like:
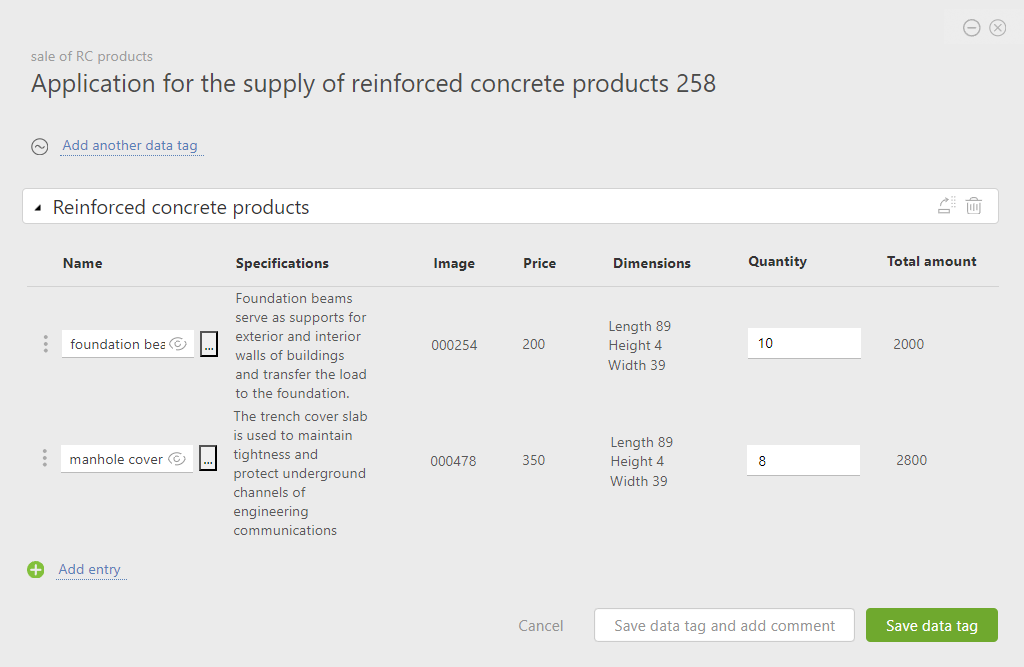
Note that the actual images aren’t visible in the rows of the data tag. Instead, Planfix inserts an identification number. After the document is created, the images are displayed as needed.
Creating a Document Template
Once the structure of the data tag is established, you can create a template based on which your commercial proposals will be made.
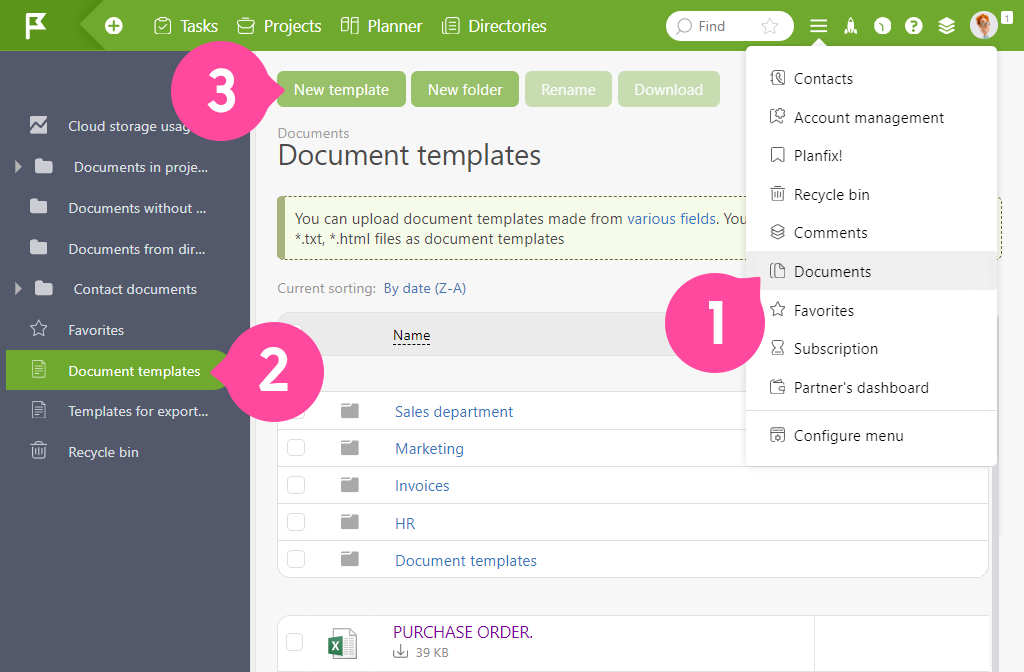
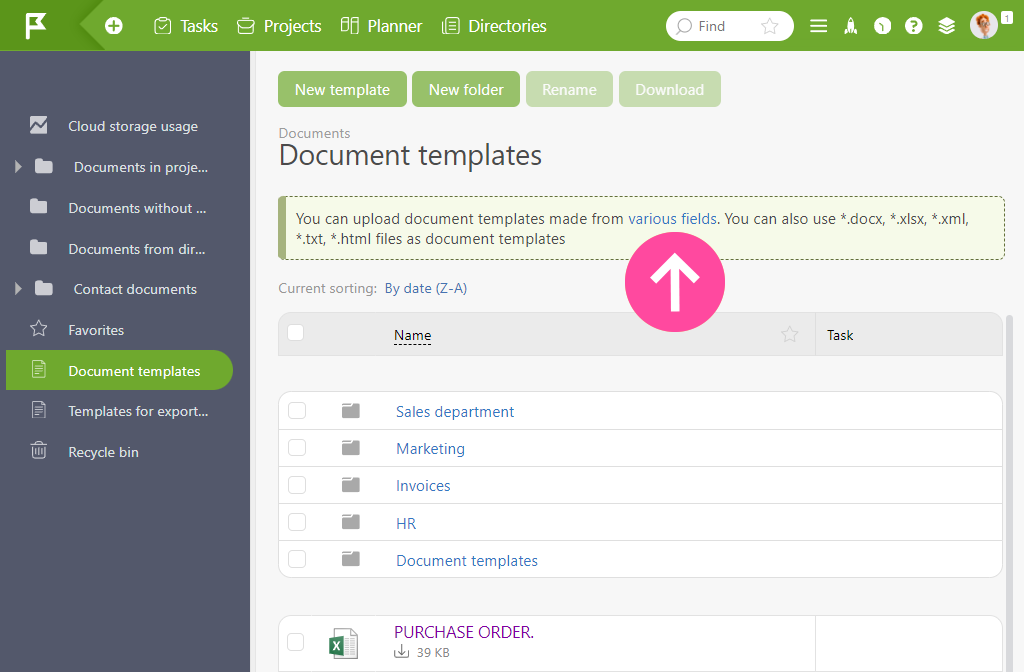
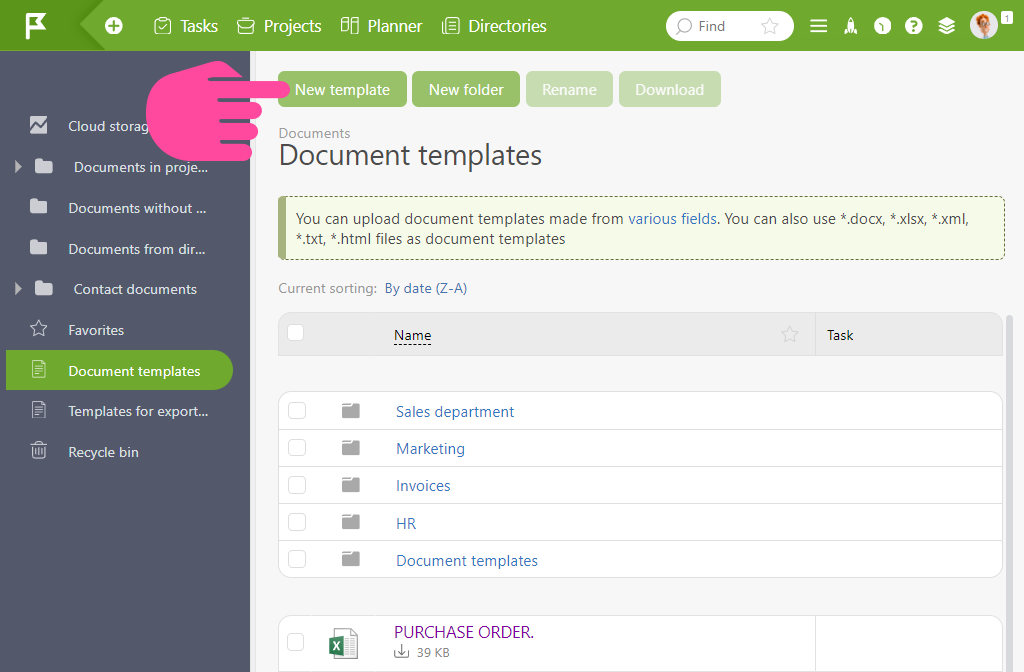
To do this, go to the “Documents” section and add a new template for commercial proposals:
Adding Variables to the Document Template
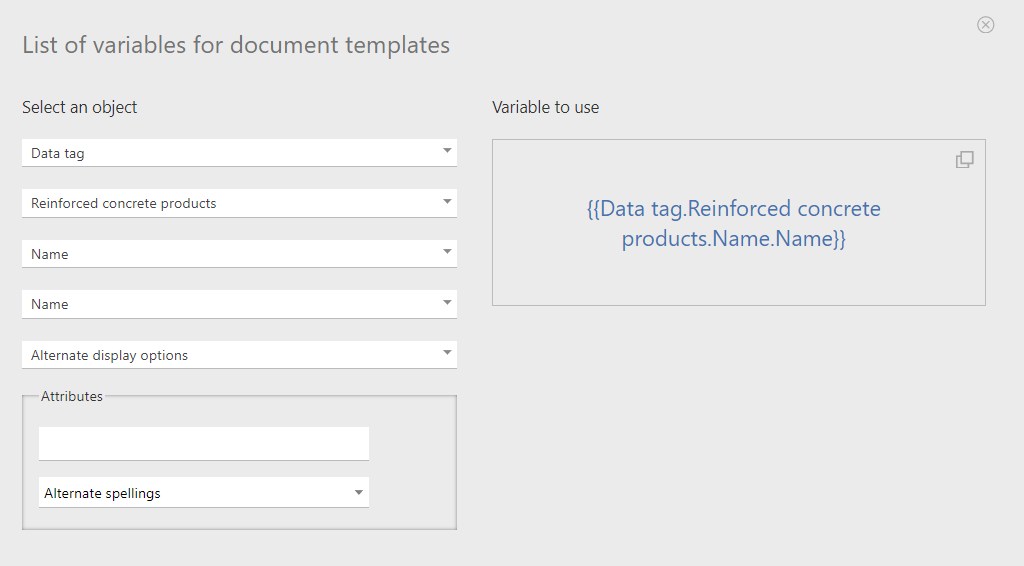
Variables should be added to the template and replaced with the required information in the final document. The document templates can specify variables in the “Variables” section:
On the left-hand side, step by step, you select the required variables and their attributes. On the right-hand side, the required variables will be created automatically:
Note: We leave the field for images empty for now. This is necessary to configure their display with the right size and location:
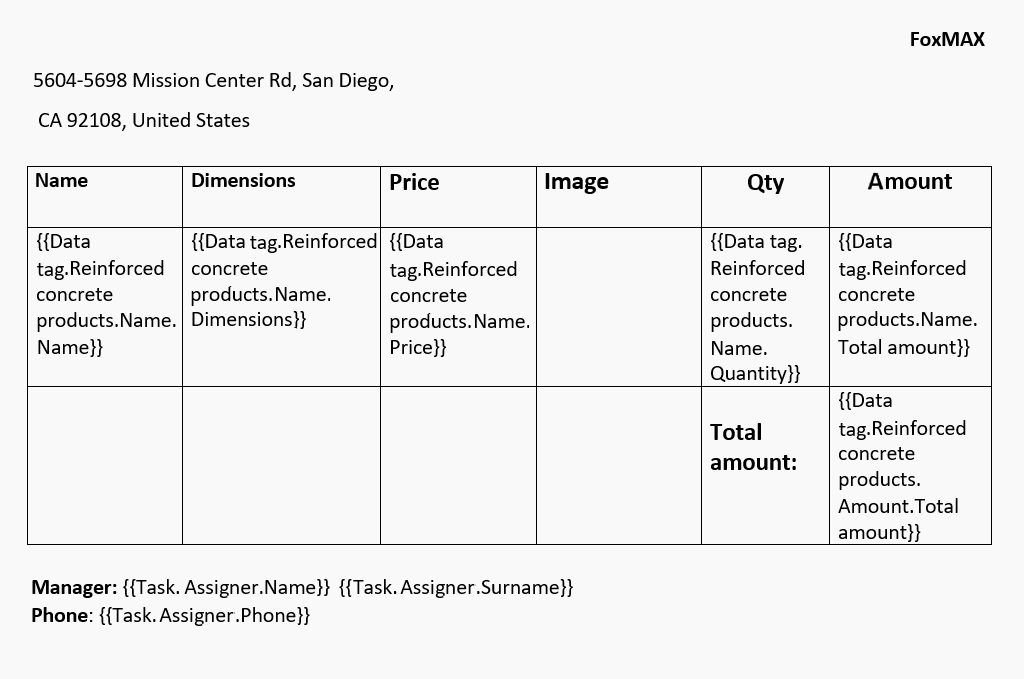
Adding a Placeholder Image to the Template
Add a “placeholder image” to the template and adjust its dimensions to ensure the images appear in the final documents precisely as needed. We will use one of the images from the directory for this placeholder:
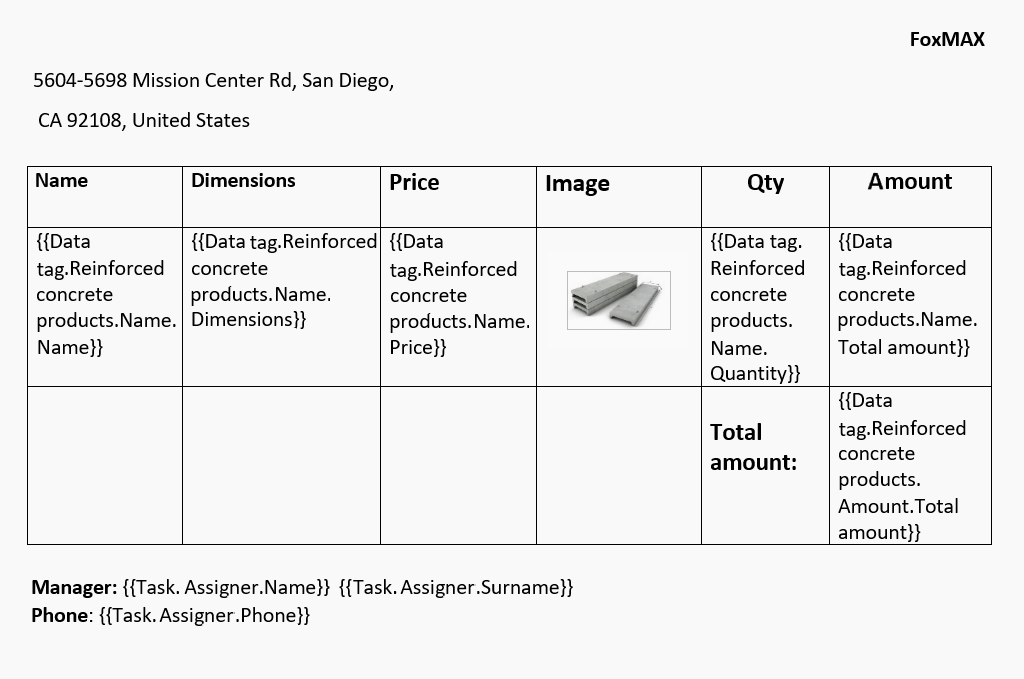
This should replace the “placeholder.”
Adding Variables in Microsoft Word
To add a variable in Microsoft Word, right-click on the image:
- Select “Edit Alt Text” in the pop-up window
- Choose “Alt-Text”
- Enter the desired variable in the image description
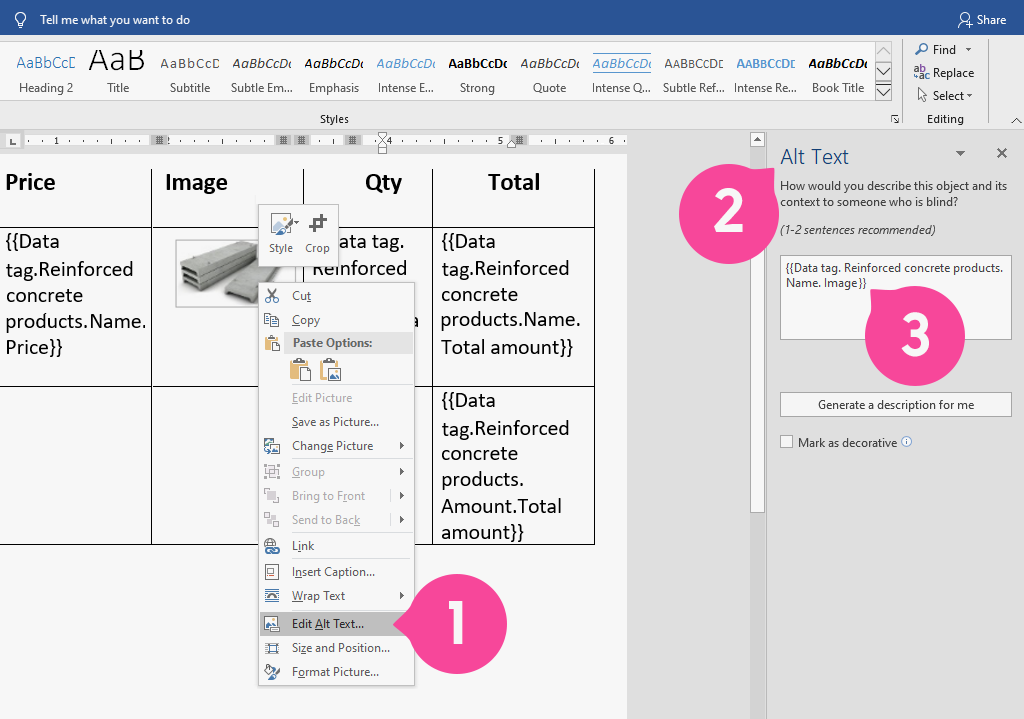
Adding Variables in LibreOffice
In LibreOffice, the process is more straightforward:
- Right-click on the image
- Choose “Properties”
- Add the variable to the description
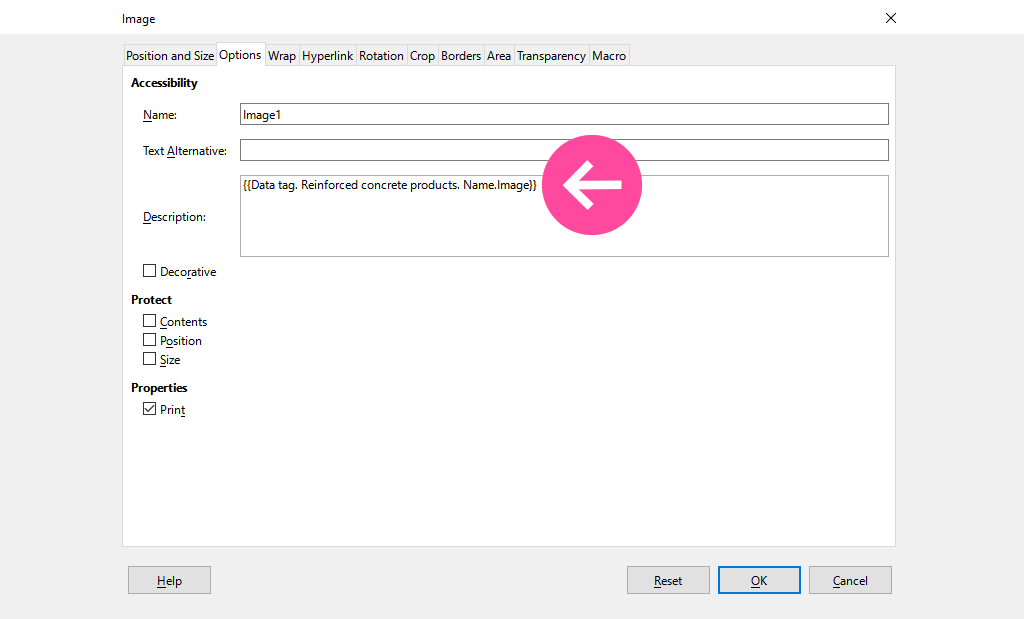
Now, the template for the commercial proposal is ready. You need to save it and upload it to the “Document templates” section in Planfix:
Preparing Data for the Commercial Proposal
We have configured everything that needed to be configured. Now, we can prepare the commercial proposal — we add the data tag with the desired product to the corresponding task:
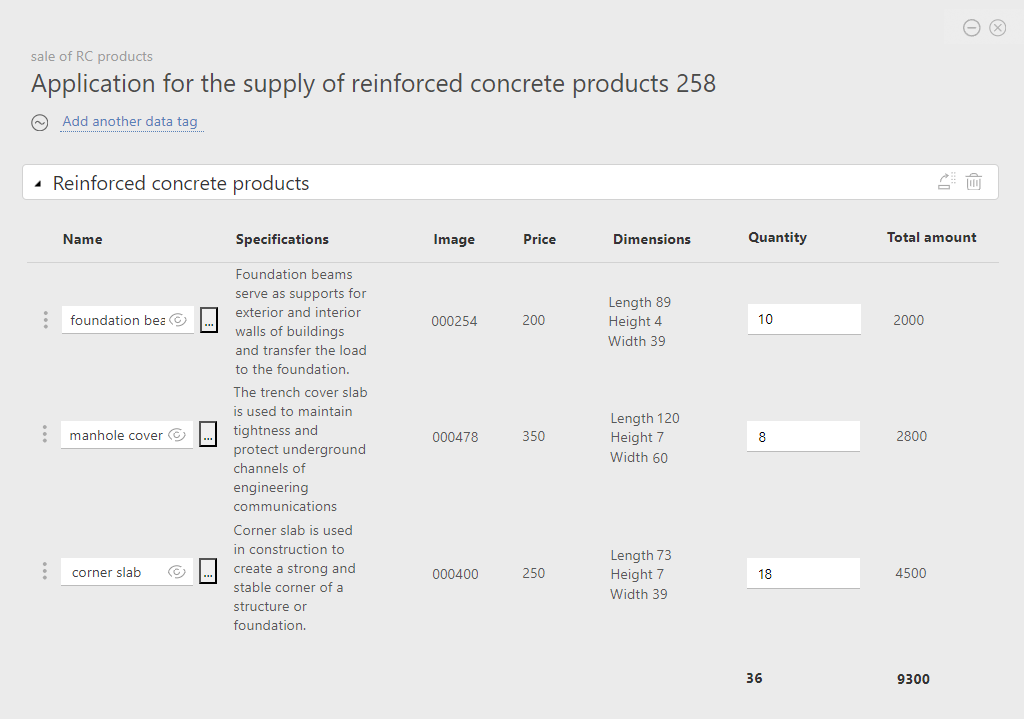
Once the data tag is added to the task, you can create the final proposal document based on the pre-filled template.
Configure a Button for Automatic Document Creation
For this purpose, we will set up a button that automatically creates the document:
- Go to Object
- Open the “Buttons” section
- Create a new button
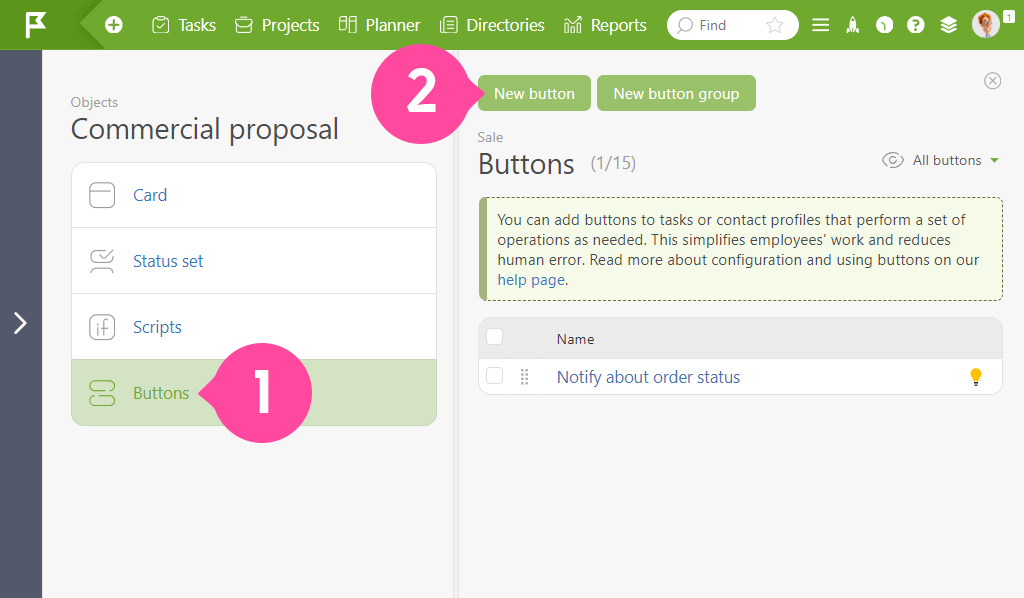
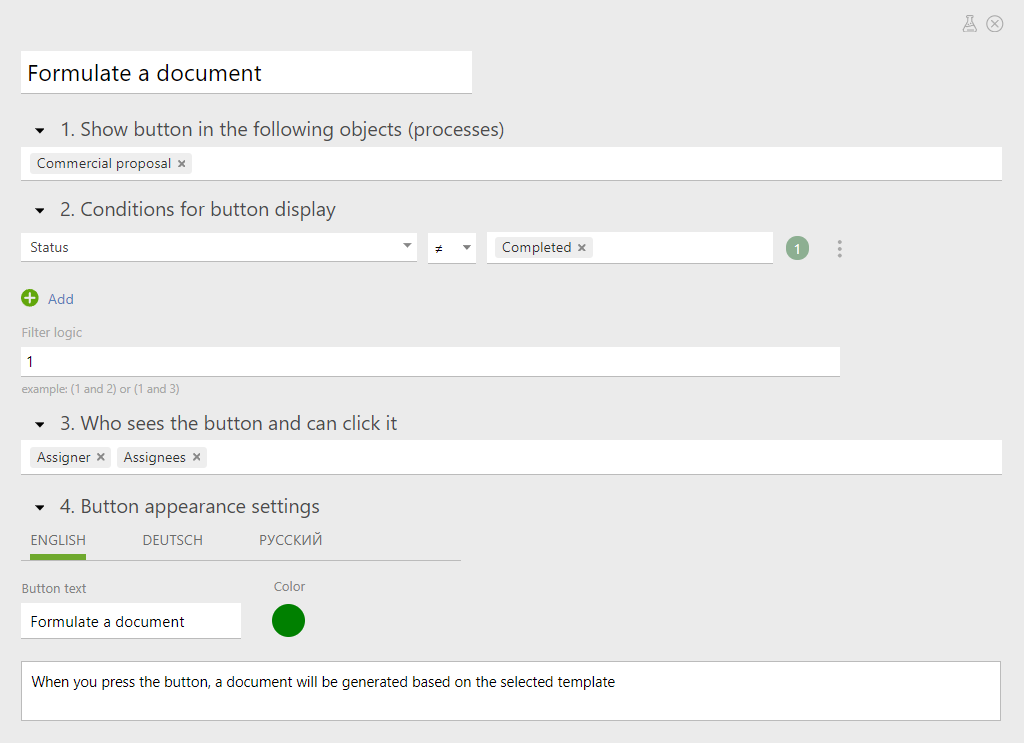
Configure the Button Parameters
First, set up the general parameters:
- Which processes should be displayed
- Under which conditions
- Who can press the button
- How it should look
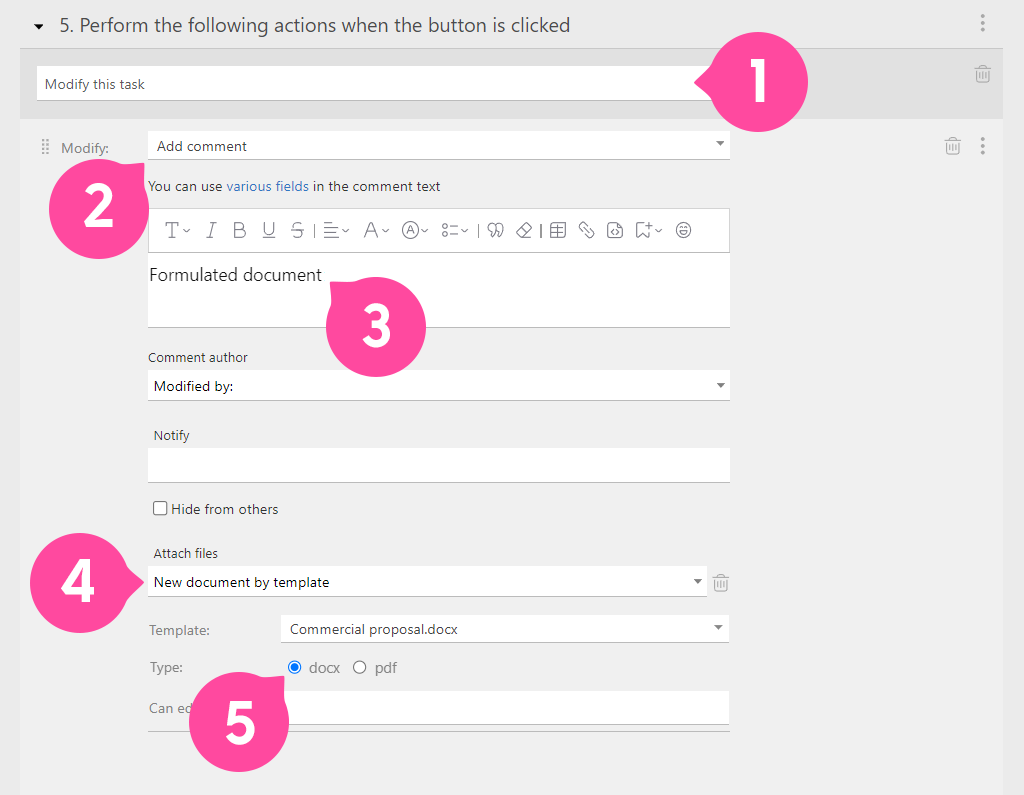
Configure the Actions to Take When the Button is Pressed
Next, set the steps that will be performed when the button is pressed:
- Select the “Modify this task” operation
- Then select “Add a comment”
- Write comment text that will inform the employee about the readiness of the document
- In the “Attach files” section, select “Create a document from a template” and specify the desired template
- You can immediately choose in which format the document should be saved — .docx or .pdf
If everything is done correctly, the assigner and the assignees will see a button like this in the task:
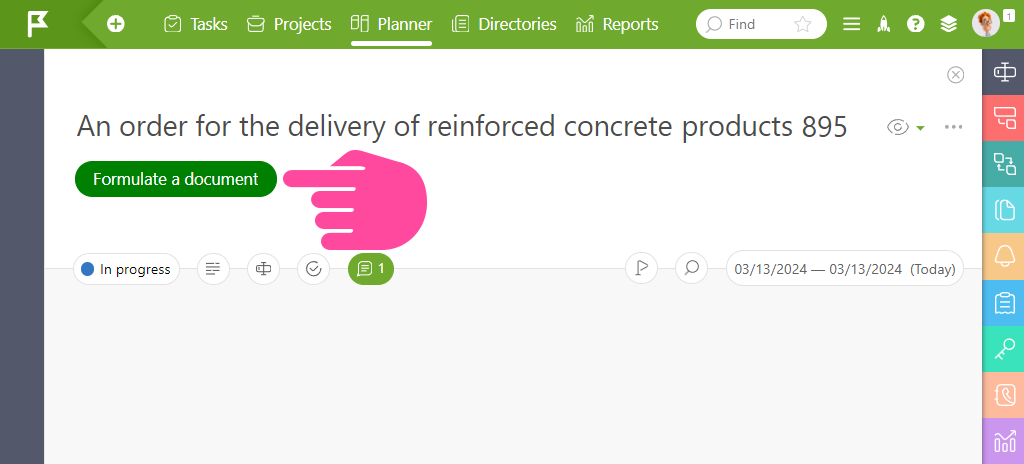
The final document will be added to the task when you click this button:
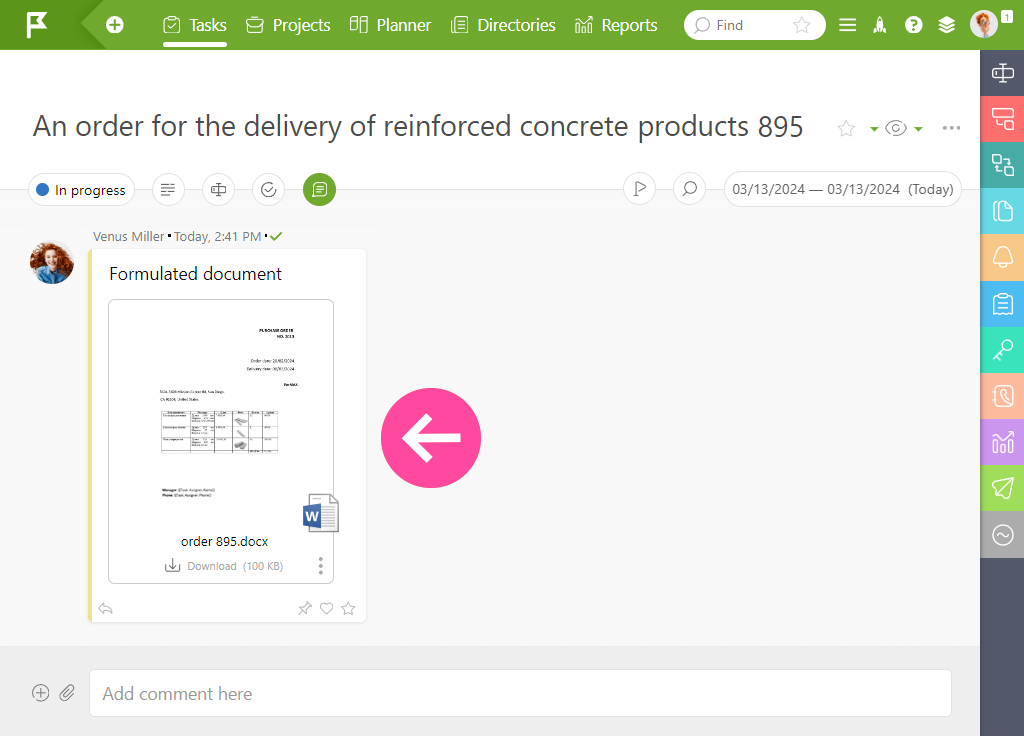
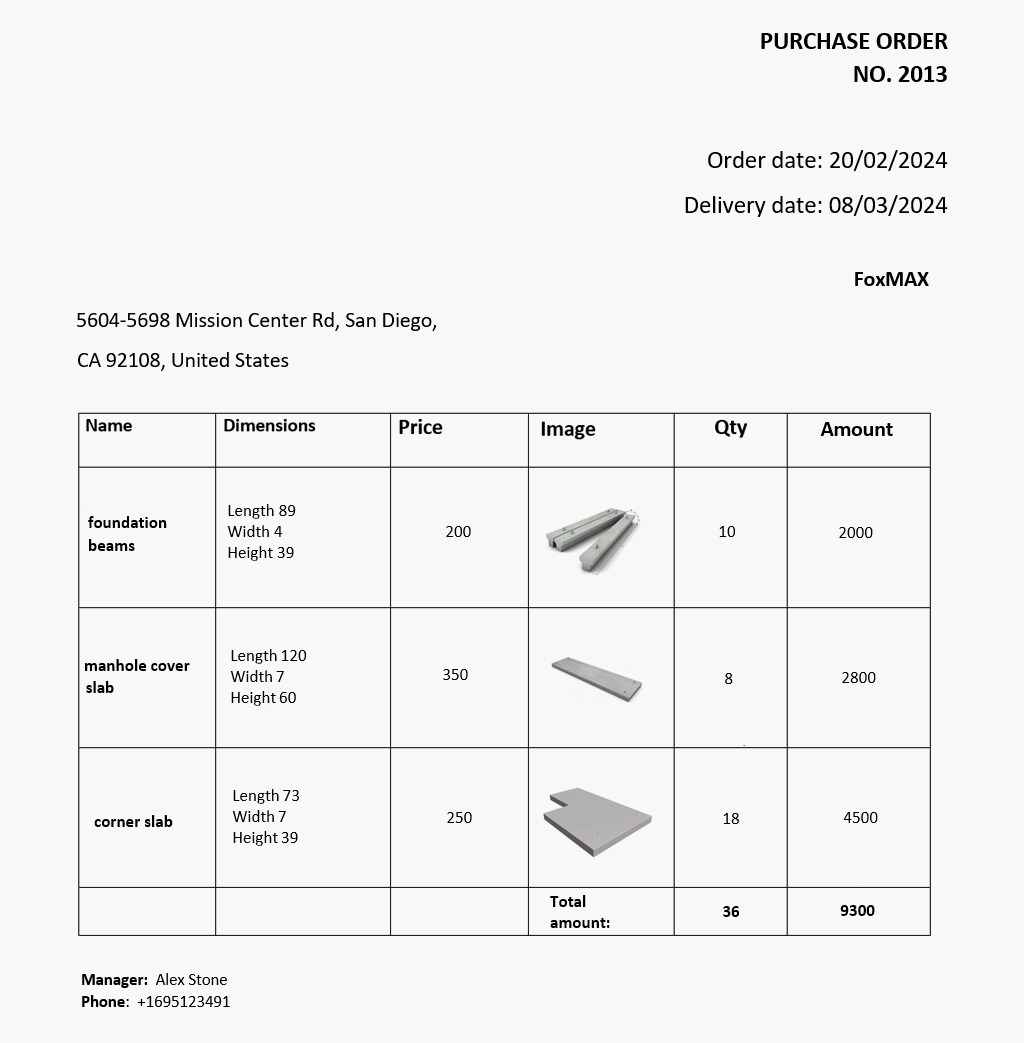
When we open the document, we see that the required details have automatically replaced the variables, and the necessary images have taken the place of the “placeholder” images:
Using Stamps in Document Templates
Similarly, you can also create documents with stamps.
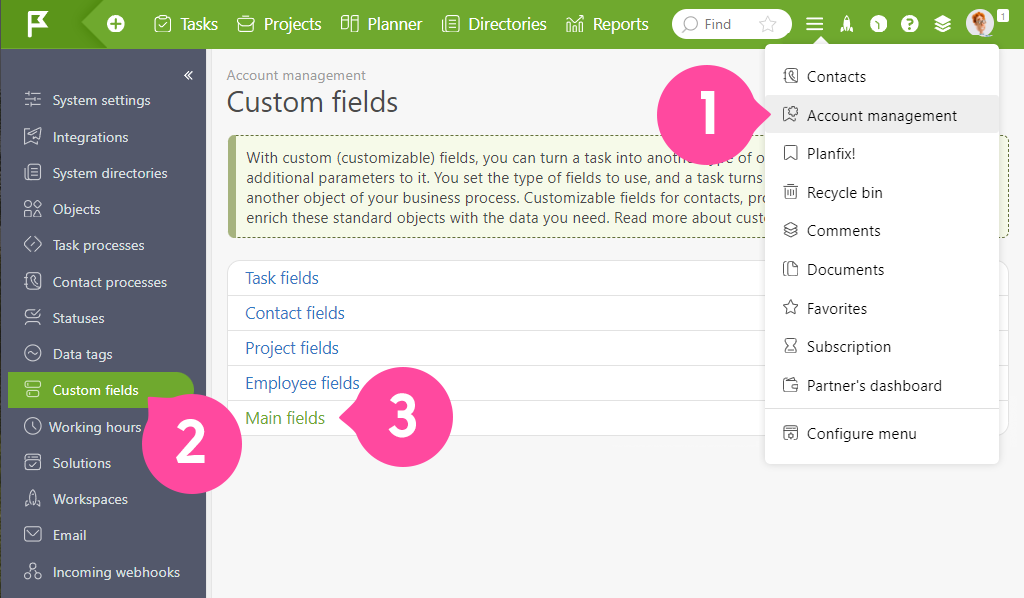
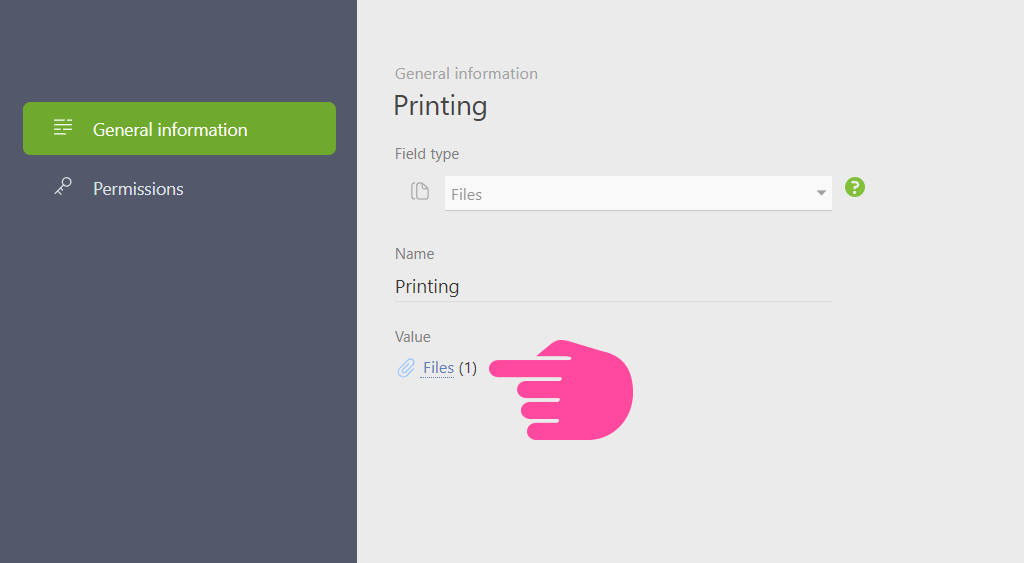
Since the stamps are applied to different types of documents, you add their image to the general fields by selecting the “Files” field type:
Then, create the desired template:
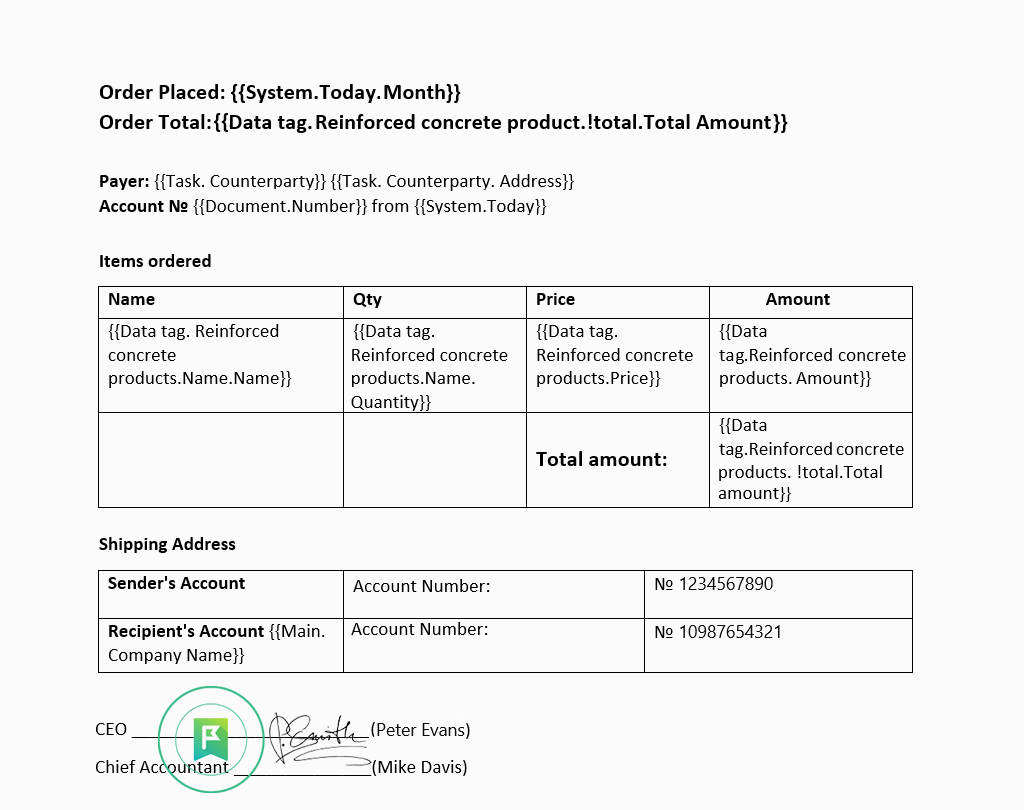
As a result, we get a document like this:
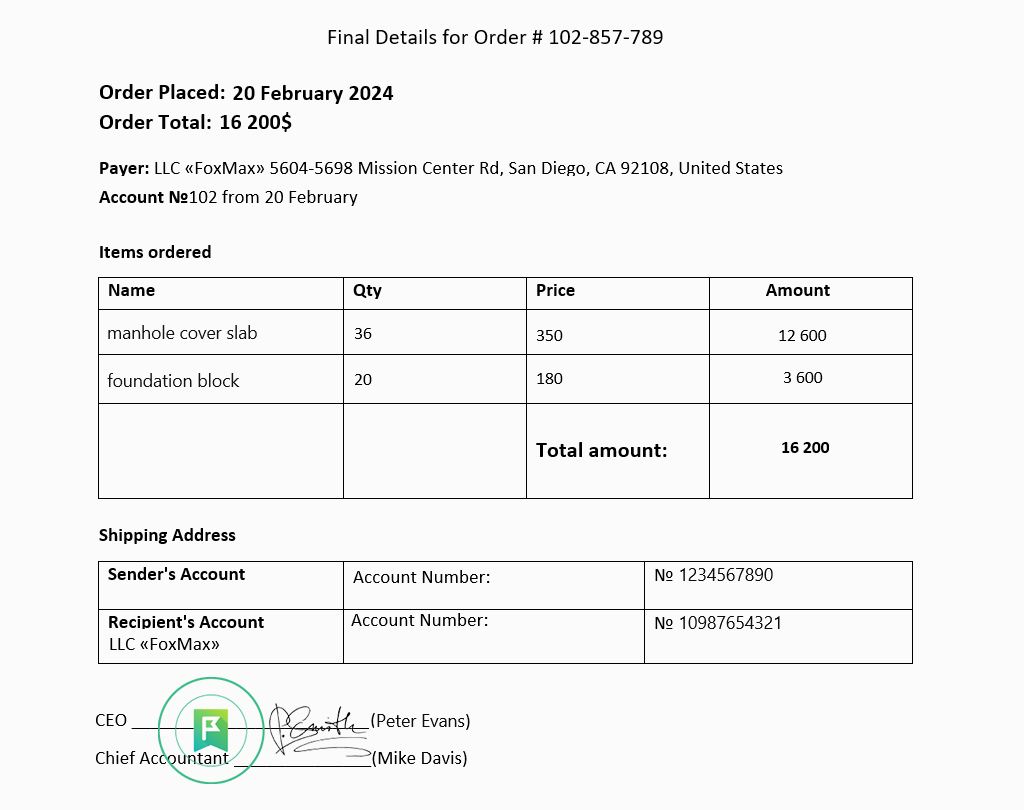
This will automatically put the stamp in the right place. You must remember to add the correct variable to the image description and upload the corresponding image to Planfix.
The image you added to the document template also serves as a “placeholder” here.
Of course, you can also do without variables by simply adding the needed document image to the template. However, if you use tables with data from data tags in the document, the image will constantly move from its correct position due to the differing number of rows added to the data tag. Therefore, it’s more convenient and practical to use a “placeholder.”
Why Do You Need Images in Your Document Templates?
In modern business operations, the integration of images in document templates serves a multifaceted purpose, offering several crucial advantages:
Improved Communication: Visual elements can help communicate complex information more efficiently, ensuring better comprehension among stakeholders, clients, or employees.
Brand Reinforcement: Images can reinforce brand identity, logos, or visual elements, ensuring consistency in marketing materials and documents, which helps in brand recognition and recall.
Increased Engagement: Documents with relevant and visually appealing images tend to attract more attention and engagement from readers or audiences, potentially leading to higher retention of information.
Professional Presentation: Well-designed templates with appropriate images contribute to a more professional and polished presentation, leaving a positive impression on clients, partners, or investors.
Clarity and Understanding: Images provide visual context, aiding in better understanding and interpretation of information, especially in technical or instructional documents of IT companies and tech startups.
Marketing and Sales: Visual elements in templates can support marketing efforts by showcasing products, services, or data, thus influencing decision-making and potentially boosting sales.
Memorability: Visual content tends to be more memorable than text alone, enhancing the likelihood of audience retention and recall of information.
Summary
Planfix has extensive features for automating routine tasks and operations.
Among other things, you can automate document fill-out based on predefined templates.
You can set it to automatically fill out numeric and text details in a document and add any necessary images.
The above examples are only a tiny part of the possible use cases for creating document templates. Their specific application depends solely on your business needs and the challenges you want to overcome.

