“Make everything as simple as possible, but not simpler.” Albert Einstein
Project templates are specific Planfix objects that simplify and accelerate the workflow within any company. The new feature will be a great advantage for anyone working with clients. We have added an additional action to the contact scripts: “Create a project from a template.” Now, you can automatically create a project with tasks directly from the contact card.
Consider the marketing agency “Fox.” The agency receives inquiries through various communication channels, such as Mail, Telegram, Facebook, Instagram, and telephony. Elizabeth is responsible for receiving these requests, processing them, and working with the contacts. She used to spend a lot of time creating a project, focusing on actions that are now automated with just the click of Planfix buttons or a contact script.
Scripts in Planfix
Scripts in Planfix involve automated sequences of operations pertaining to tasks or contacts. These operations are tied to a distinct event and a defined set of conditions. Contact scripts allow to arrange automatic operation sequences for contacts associated with distinct events and conditions. Task scripts allow to establish task life cycle stages by adding statuses, and formulate strings of automated actions.
Create Project Templates in Contact Scenarios
Next, I’ll show you the settings so you can automate task, replicate projects, and simplify your work, just like Elizabeth did.
Create Fields
Begin by creating a new project template with the required task templates:
Project template
Next, create a Contact field with a list of services offered by the agency:
Creating a contact field
Set Up the Button for the Project Template
Navigate to “Account management” — “Contact processes” — for example, “Standard” — “Buttons”
Buttons in contact process
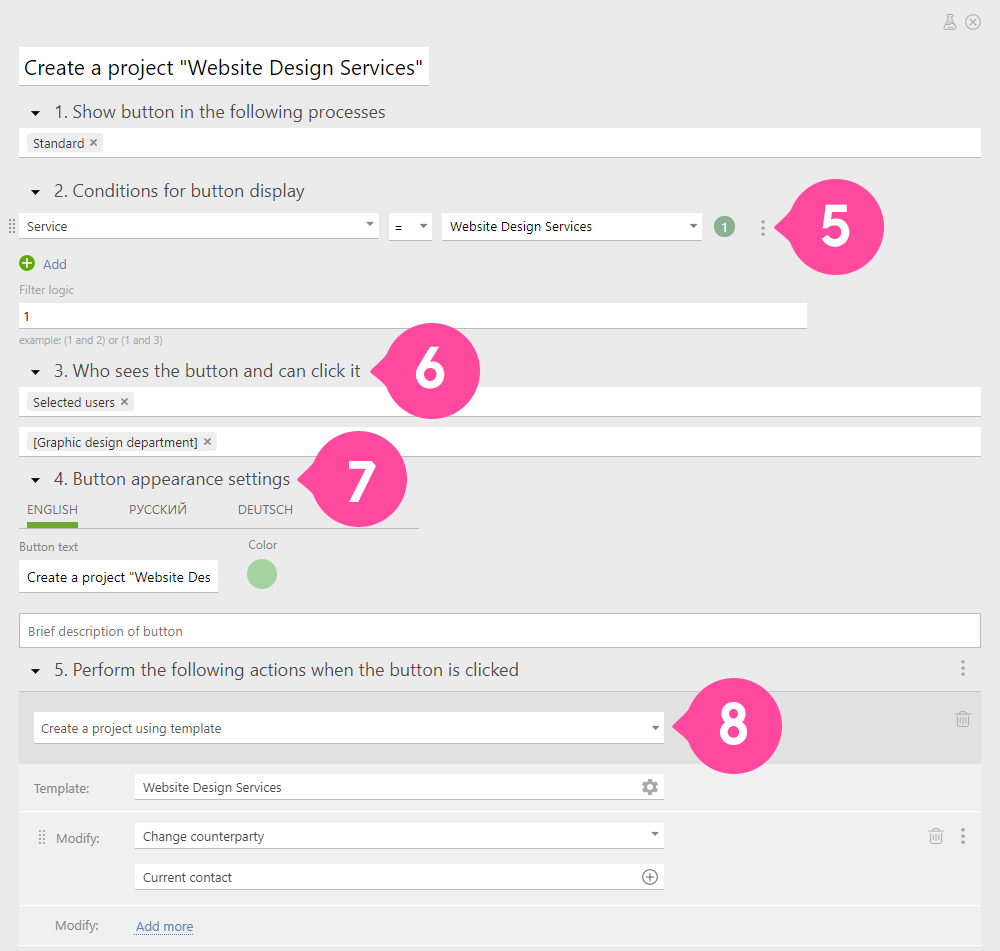
Create a button with a descriptive name:
- Select the conditions under which the button should be displayed. In this example, we will set up the button for the “SEO website promotion” service.
- Specify the employees who should have access to the button.
- Customize the appearance of the button.
- Choose the action that will be performed when the button is pressed:

Button settings
Select a Service
In the customer card, you can now select a service, for example, “SEO website promotion” — this is the contact field we created earlier:
Selecting the desired service
Once the service is selected, a button to create the project will appear:
A button to create the project
Create an Automation Script
When you press the button:
- A project is automatically created with all the tasks you specified in the project template.
- The contact will automatically be connected to the project as a counterparty. Now you don’t need to add it manually or set up complex automation for the connection:
A project with tasks is created using the button.
The Bottom Line
This new feature frees you from additional steps and saves time. Simplify and automate your work and your team’s work to optimize your productivity. Employing scripts offers a range of advantages, including the ability to ensure consistent and standardized communication, boost efficiency by automating repetitive tasks, and enhance customer interactions through personalized and timely responses. In the end, let the robots take charge of the tasks!


