
What is Resource Management, and Why is It Important?
Resource management involves effectively planning, organizing, and allocating a company’s resources, such as finances, personnel, materials, and time. It is undoubtedly a crucial aspect of any business activity. Automating resource management allows for optimizing resource use, cost minimization, and overall enhancement of company efficiency.
What Is Meeting Room Management in Planfix?
Meeting Room Management in Planfix is a comprehensive feature designed to organize the process of scheduling and utilizing office meeting spaces efficiently. It allows teams to automate the booking of meeting rooms, preventing conflicts and enhancing overall productivity during collaborative sessions. With intuitive setup options, including data tags and planners, Planfix ensures a seamless experience for configuring and visualizing meeting room occupancy. This feature extends beyond just meeting rooms, offering a versatile solution for optimizing various aspects of office resource management.
How to Manage Meeting and Conference Rooms in Planfix
Planfix’s extensive features enable you to configure and automate the management of any resources within your company. This article explains how to organize the booking of meeting rooms in Planfix to ensure efficient use of space and resources, minimize scheduling conflicts, and increase employee productivity during meetings.
Setting Up Meeting Room Management in Planfix
Imagine you have a meeting room in your office. Our goal is to manage the room in such a way that employees can plan and determine its availability, considering the available time slots. To do this, we will use Planfix analytics with the “Period” attribute and the “Hourly Calendar”planner. We’ll also involve a few idle employees to begin using the meeting room as we set up the necessary configurations. Let’s start with configuring the data tags.
Meeting Room Data Tags
Meeting Room Data Tags In the “Account Management” section, under “Data Tags,” add a new data tag called “Meeting Room”:

Meeting Room Data Tags
These data tags should include fields such as “Date” (the date when the room is occupied) and “Period of time” (the reserved time). If specific employees frequently use the meeting room, you can grant them access to the “Meeting Room” data tags.

Setting Up Access to Meeting Room Data Tags
Now, let’s move on to the planner, where we can view the data from the configured data tags, which represent the meeting room’s occupancy.
Planner
You can either create a new planner for the meeting room or use an existing one. We’ll configure an existing planner, but the process for setting up a new one is the same:

Setting Up an “Hourly Calendar”
Note that there shouldn’t be any preferences in the “Selection Parameters” tab. It should look like this:

“Selection Parameters” tab
On the “Data to Display” tab, select the appropriate data tag:

Selecting the Data Tag “Meeting Room”
Here, we’re setting up the calendar grid, for instance, for the workweek:

Calendar Table for the Meeting Room
This will provide you with a “blank table” that is currently empty, but we’ll populate it shortly:

Calendar Is Ready to Be Filled with Data
Take one of the tasks from the left column and drag it into the “meeting room” for a specific time slot. For example, you can choose from 3:55 to 5:25 p.m.:

Dragging tasks into the calendar
If you click on the card for this task, you’ll see that our data tag is attached as a comment:

Data Tag “Meeting Room” in the Task on this Card
This card indicates the time of the meeting:

Time of the Meeting
This is what happens with any task you drag from another planner list into the meeting room occupancy grid: the “Meeting Room” data tag is automatically attached.
If you want to create a task and book a meeting room directly in the grid, click on the desired start time and drag to the scheduled end time of the meeting:

Task creation directly in the planner
If the meeting room is in high demand in your organization, the grid may look like this:
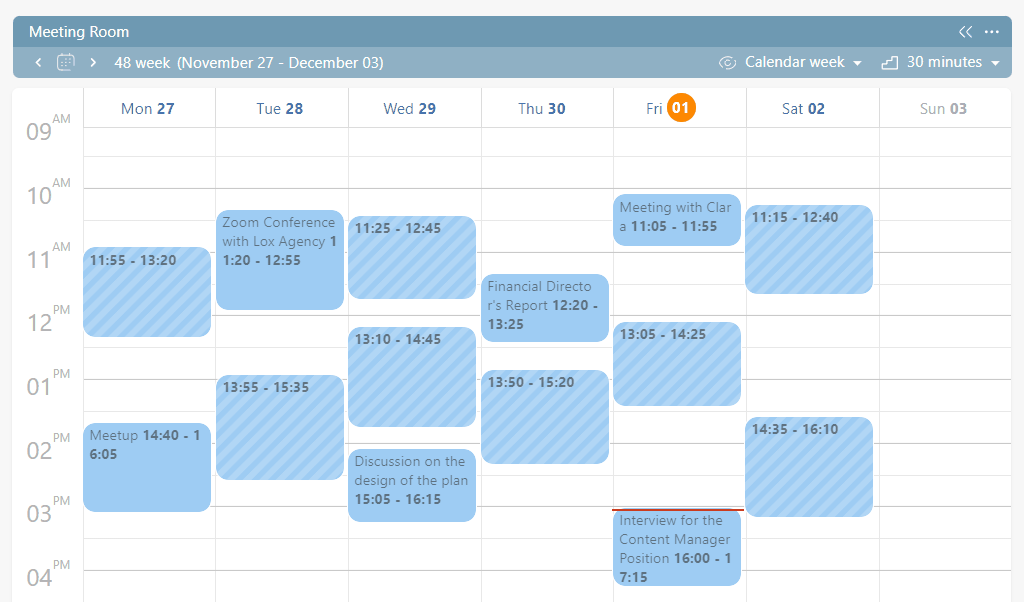
Example of the demand for a Meeting Room in the Company
Please note that tasks the worker doesn’t have access to are marked with diagonal lines. If you click on such a task, the employee will only see when and by whom the meeting room is occupied:

The employee sees who occupies the meeting room
Conclusion
With Planfix’s room scheduling software, you can efficiently organize and manage access to rooms for meetings, conferences, and other events in your office or organization. Using the same principles, you can also streamline processes like renting equipment, using corporate vehicles, booking event spaces, and more. The most essential meeting room booking tools for this, as previously mentioned, are data tags, a CRM planner, and the included hourly schedule and hourly calendar. Of course, you’ll also need a willingness to fine-tune the settings.