Account Management
Companies create their own accounts for working with Planfix. An account is a designated information space for a company, and it contains certain specific resources.
The user who creates the account will automatically become its owner. We strongly recommend adhering to the following rule: "The account owner should be a manager at your company." Suppose an account was created by someone who isn't a manager, account ownership rights should be transferred to a manager.
Account name
The account owner sets the account name when creating the account.
Account names generally align with the name of the company or brand they're associated with. One use of the account name is the third-level domain for the account on one of the Planfix domains (planfix.com, planfix.ru, planfix.ua). For this reason, account names can only contain symbols allowed in domain names: Latin letters, numbers, and some special characters.
Example:
- The company Oza LLC has an account called Oza
- Their employees log in at https://oza.planfix.com/
The account name can be changed at a later date at the owner's request (see below)
Account management
Only one user has full access to account management: the account owner, who created the account. Users with administrator access and technical administrators have limited access to account management.
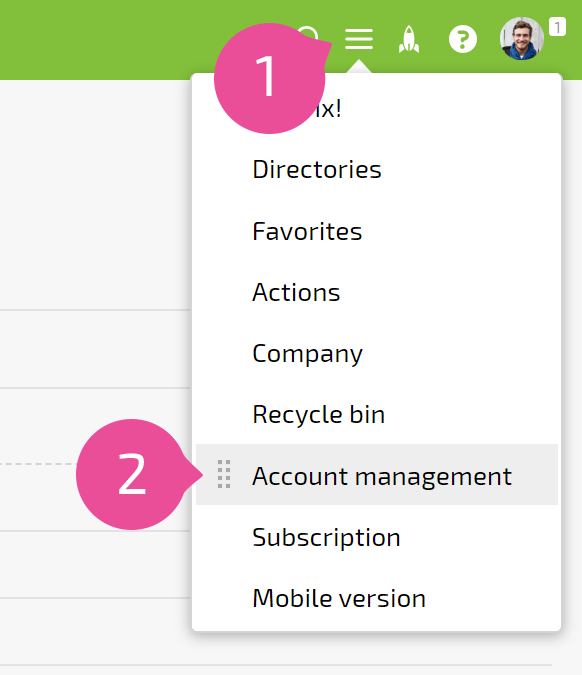
The link to account management is found in the expanded Main menu list, which is located in the upper-right corner of the screen:

The following tabs are in the Account management section:
- Objects– Allow the creation and customization of an object, a digital twin of a physical object, or a real-world process within Planfix.
- Processes – Enables the creation and editing of new processes and existing ones.
- Statuses – Allows you to create and customize task statuses.
- Data tags – Provides tools for configuring data tag workflows and creating new data tags.
- Custom fields – Supports working with fields in tasks, projects, contacts, employees.
- Working hours – Allows you to configure the company’s working hours.
- System directories – Contains system-wide reference materials.
- System settings – Let you configure settings that apply across the entire account.
- Solutions – Manages the available solutions in Planfix.
- Integrations – Enables integration of Planfix with external services.
- Workspaces – Provides a dedicated area for managing workspaces within the account.
- Email – Contains general account settings for email management.
- Access to API – Allows management of keys required for using the Planfix API.
- Account owner – Enables transferring account ownership rights to another user.
- Account security – Manages two-factor authentication settings and access rules for various users.
- Data export – Allows exporting all account data.
- Delete account – account owners can delete their account.
Changing your account name
The process for changing an account name is free and available for:
- accounts during trial periods (the first 14 days after signing up)
- paid and premium accounts
If you decide to change your account name, your account owner must write to Planfix Support and specify the desired new name. We will receive your request and change your account name.
After the name-change process is complete, all of the employees who use your account will receive an email notification with the new login URL.
All previous internal addresses associated with the old account name will no longer be accessible, and you will no longer be able to receive emails to those addresses. Here’s what you need to do:
- Update all email forwarding settings, email processing rules, and any other configurations where the old account name was used to the new account name.
- If you are using the API or integrations (including telephony integrations), you will need to reconfigure them accordingly.
Useful information
- You can work with data from different accounts in one main account by setting up a connection between accounts. This lets you keep all tasks and events in one place and process them without switching between accounts.
- You can work with users from different Planfix accounts and assign them tasks right from your account or by email.
- Unused Planfix accounts are deleted after a certain period of time. It's important to familiarize yourself with our process for automatically deleting accounts.
Important
Unused Planfix accounts are deleted regularly. Please make sure to review the account auto-deletion procedure.
