Planfix is a universal team-management tool. Along with other business processes, our support team works in Planfix.
In this case, we’re going to discuss how we use the functionality of assigning tasks by email to organize the support work of Planfix itself. We’re not unique in this regard — many of our users have moved their tech support to Planfix. The main advantage is that your tech support is working in the same system as the rest of your company, making it easy to link specialists to issues involving any department, bring a client suggestion into a wider discussion, or turn a ticket into a task for a development team.
This case will be interesting as a model for organizing a support team using Planfix and as an illustration of what the system is capable of.
How Messages from Clients Can Be Brought Into Planfix
Here are three options:
- Emails forwarded from an external mailbox (in our case, it’s support[at]planfix.com).
- Tasks set from another account for an employee in your account (which we often do ourselves — every Planfix account has a contact called “Planfix Support,” and tasks assigned to this contact are automatically sent to our account).
- Tasks are assigned using the Planfix API (which can be used when creating tasks based on requests or orders from a company site).
In our opinion, the simplest and most accessible of these methods is the first, using email. Clients are used to sending emails, and practically any CMS can generate emails. Using this method, it’s easy to ensure that all requests from your site make it to Planfix, a central location where they can be processed and stored with all their history. Another key advantage of this method is that it’s universal and doesn’t require any programming as the API does.
Where Should Emails Be Sent?
Every Planfix user has an internal email address: username@account.planfix.com. Emails sent to this address get turned into tasks in your account. Therefore, all that you need to do is set up forwarding from your support email address to this internal Planfix address.
It’s best to set this up in your external email address settings. If you set it up in your mail client, emails will be sent to Planfix from you, not from the original sender, which isn’t what you want.
Setting Rules for Tasks from Email
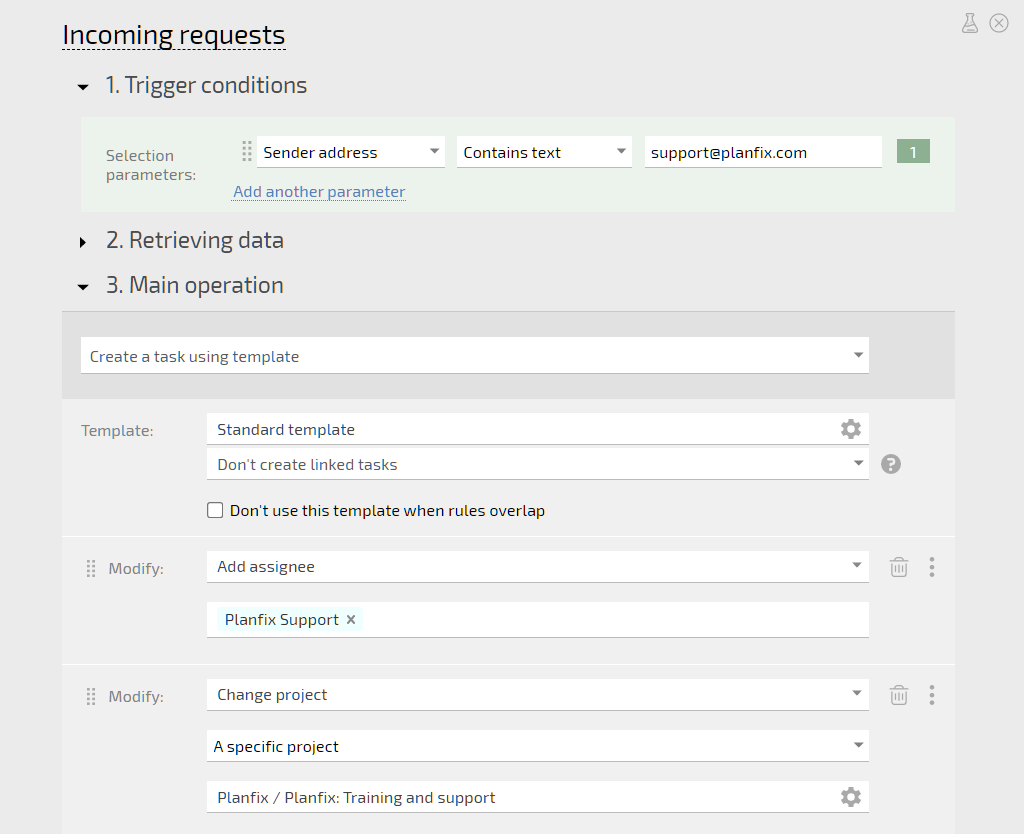
For our support team, we automatically forward all emails sent to the team to the internal mailbox of our Planfix account administrator. In order to have tasks created exactly how we want them, the administrator added a special rule to their account for creating tech support tasks from these emails:

Simply put, this involves:
- creating a task using the standard template for every email sent to tech support
- setting the “Tech support” employee group as the assignee
- moving the task to the “User support” project
Tasks from emails sent to our Planfix support address are created using this rule.
Here’s an important point: tasks are created on behalf of the email’s sender. We just mentioned that you should set up forwarding that preserves the email’s original sender, and here’s where that’s useful. Planfix sets the sender of the email as the assigner, which has at least two benefits:
- We work with “live” names of users, meaning names are displayed in Planfix exactly how they’re entered in people’s email settings. This is typically a person’s name, although occasionally, it’s a username or company name.
- We can view all users who have contacted us in our contacts list. If a user isn’t in this list when an email from them is turned into a task, they’re automatically added when the task is created. This means that we can view the history of our communication with any user at any point. There’s a “Tasks” tab in all contact cards where all this information is neatly stored.
But the most crucial part is that we can communicate with clients directly from Planfix, like an email project management system.
Communicating with Clients
Since clients are task assigners for us, we can communicate with them directly from tasks:
- comments added to tasks that notify a client are sent to their email address as an email notification from Planfix
- the client’s response to this email notification is sent back to the task as a new comment written by the client
Because of this, we can work with client requests in Planfix while the client continues writing to us over email — no need for them to learn the ins and outs of a new system.
For the client, contacting tech support is nothing out of the ordinary. The emails from Planfix are sent on behalf of the specific people who wrote the comments on the tasks, and they’re grouped in one email thread.
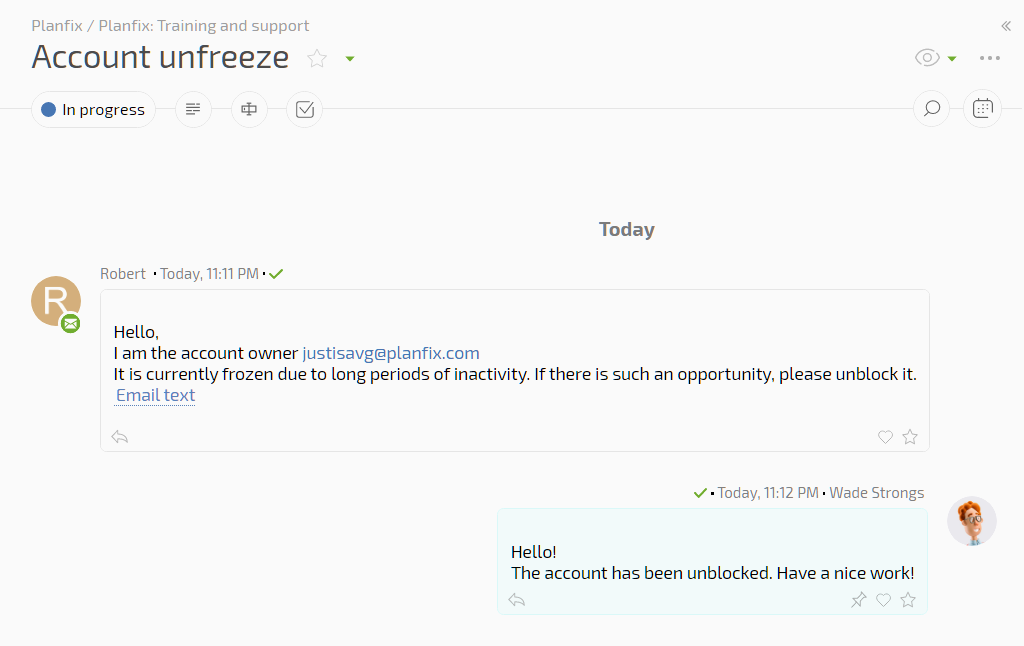
The most convenient is linking any specialist to a task and communicating amongst ourselves directly in the task comments. The client only sees the comments that we notify them about, meaning we can go back and forth as long as we need to in order to work out a solution to their issue, and in the end, we only need to inform them about our final results:

At the same time, the entire history of our communication regarding the issue remains in Planfix, and we can return to it in the future as needed. This is useful as a record of our communication with the client and for monitoring tech support response times. Task logs record when tasks were created, accepted, responded to, and more.
Tracking Tech Support Working Time
Employees working on tickets can add an “Actual working time” data tag to any comment, specifying the time they spent and the type of work they did. This information is then used in time tracking reports and can be counted in payroll calculations.
If your company has a different way of tracking work with clients, it can also be implemented in Planfix.
Use Planfix as an email project management tool to track communications without moving away from client work. 🙂

