Customer Service Solution - Adding employees: Difference between revisions
From Planfix
No edit summary |
No edit summary |
||
| Line 10: | Line 10: | ||
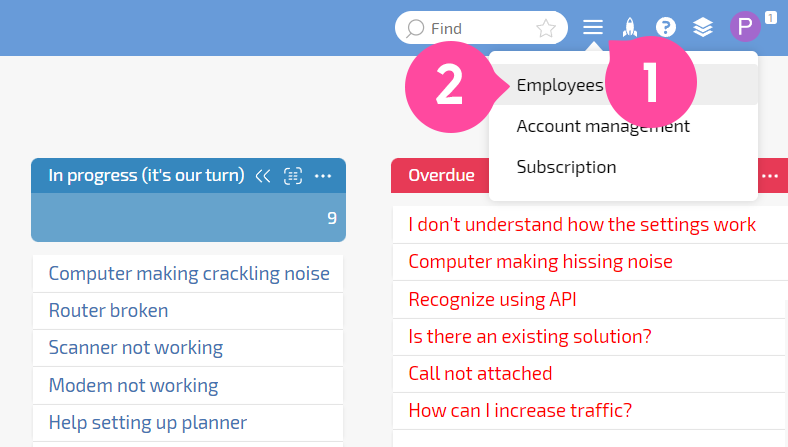
*Go to the '''Company''' section: | *Go to the '''Company''' section: | ||
https://s.pfx.so/pf/ | https://s.pfx.so/pf/3I/Xl5JHL.png | ||
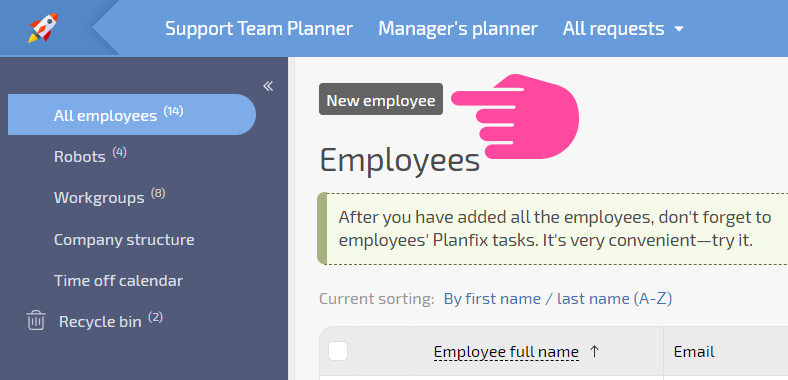
*Add a new employee: | *Add a new employee: | ||
https://s.pfx.so/pf/ | https://s.pfx.so/pf/Ft/ZwA3k2.png | ||
| Line 20: | Line 20: | ||
*Enter the '''first name''', '''last name''', and '''email address''' of the employee | *Enter the '''first name''', '''last name''', and '''email address''' of the employee | ||
*In the '''Groups''' section, add the Customer Service group: | *In the '''Groups''' section, add the Customer Service group: | ||
https://s.pfx.so/pf/X5/Ghx711.png | |||
Click "Create Employee" | *Click "Create Employee" | ||
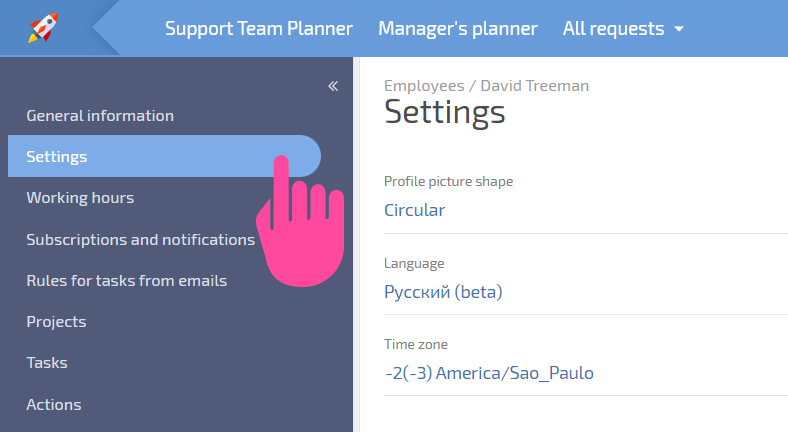
Navigate to the "Settings" section in the created employee's profile: | Navigate to the "Settings" section in the created employee's profile: | ||
https://s.pfx.so/pf/jQ/zW0BFt.png | |||
*Set the Customer Service workspace by default: | |||
Set the Customer Service workspace by default: | https://s.pfx.so/pf/Ho/TWjuiI.png | ||
The employee will receive an invitation with an activation link to your specified address. When he clicks on the link, he independently sets a login and a password for further work in Planfix. | The employee will receive an invitation with an activation link to your specified address. When he clicks on the link, he independently sets a login and a password for further work in Planfix. | ||
After logging in, he can start working immediately in the Customer Service workspace. | After logging in, he can start working immediately in the Customer Service workspace. | ||
Revision as of 09:08, 2 March 2023
To add employees who will work with requests in the Customer Service configuration, follow these steps:
- Go to the Company section:

- Add a new employee:

- Enter the first name, last name, and email address of the employee
- In the Groups section, add the Customer Service group:

- Click "Create Employee"
Navigate to the "Settings" section in the created employee's profile:

- Set the Customer Service workspace by default:

The employee will receive an invitation with an activation link to your specified address. When he clicks on the link, he independently sets a login and a password for further work in Planfix.
After logging in, he can start working immediately in the Customer Service workspace.
